How to Install and Wire a Dimmer Switch in Greeley, CO (Step-by-Step Guide)
Installing a dimmer switch is one of the simplest upgrades you can make to improve lighting control, comfort, and energy efficiency in your home in Greeley, Colorado. Whether you’re upgrading a living room, bedroom, or kitchen lighting, a properly installed dimmer lets you adjust brightness to match your needs instantly.
However, successful installation depends on two things: correct wiring and proper bulb/dimmer compatibility.
This guide walks homeowners in Greeley, CO through the full process step by step.
Call
ACDC-Electric
at 970-330-1656
Safety First (Do This Before Anything Else)
Electrical work is safe when done correctly, but mistakes can be dangerous.
Before starting:
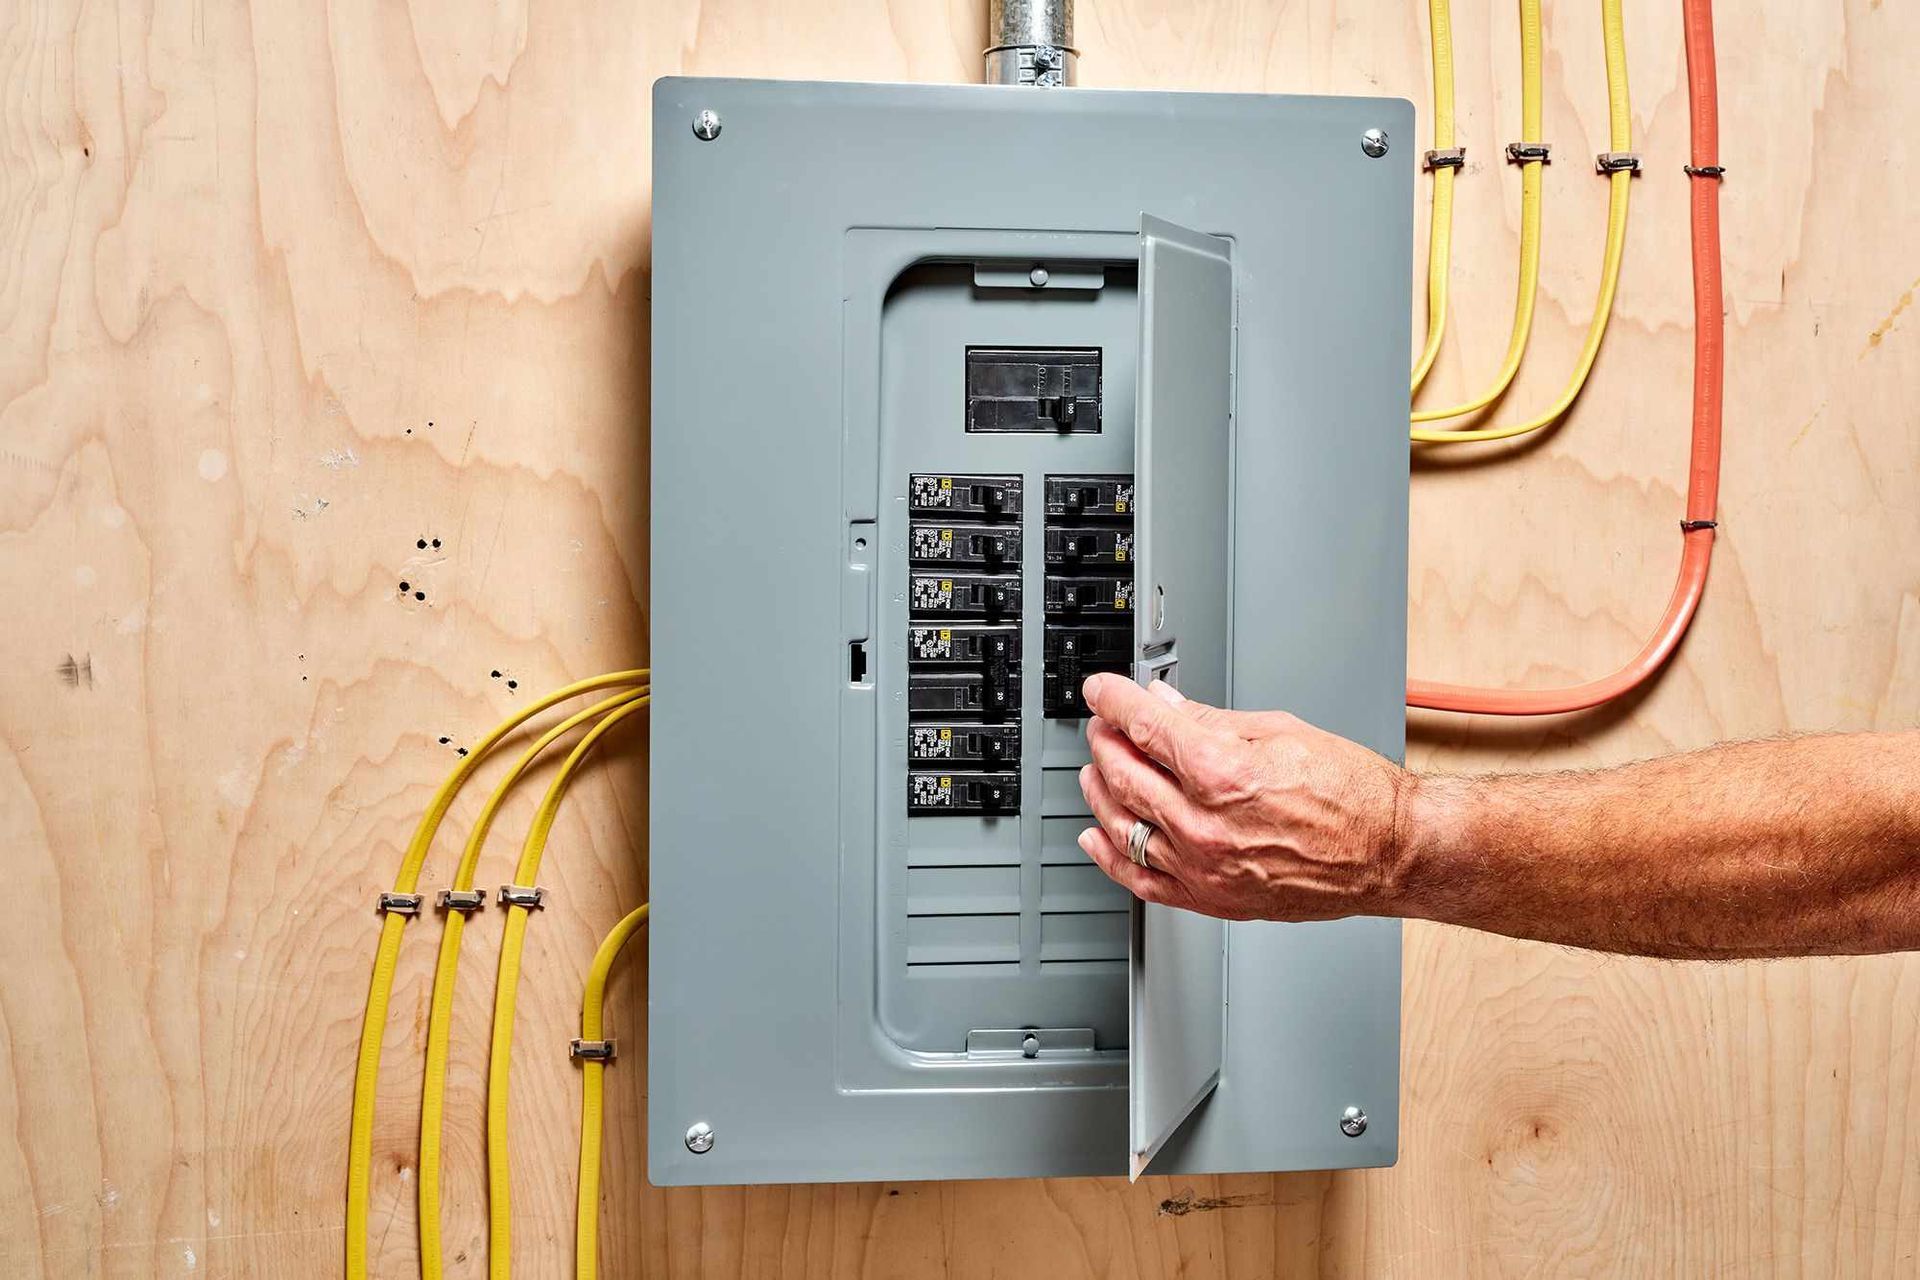
· Turn off power at the breaker panel
· Verify power is off using a voltage tester
· Never rely on just the wall switch being off
· Work in a dry, well-lit environment
If wiring looks damaged, outdated, or confusing, contact a licensed electrician in Greeley, CO.
Tools and Materials You’ll Need
Gather everything before starting:
· Flathead and Phillips screwdrivers
· Voltage tester
· Wire stripper
· Wire nuts
· Electrical tape (optional)
· Compatible dimmer switch
Before installing a dimmer switch, it's essential to choose the correct type for your lighting setup. Using the wrong dimmer can cause flickering, buzzing, overheating, or limited dimming range.
Common Dimmer Types
- Single-Pole Dimmer: Controls one light from one location.
- 3-Way Dimmer: Works with a second switch to control one light from two locations.
- Smart Dimmer: Wi-Fi, Zigbee, or Z-Wave enabled for app or voice control.
- Leading-Edge (Triac) Dimmer: Best for incandescent/halogen lights.
- Trailing-Edge (ELV) Dimmer: Best for LED fixtures and prevents flicker.
Compatibility Notes
Not all bulbs and dimmers work together.
LED Lights
· Must be labeled “dimmable”
· Require LED-compatible dimmers (ELV or trailing-edge types)
Incandescent & Halogen
· Generally compatible with most dimmers
CFL Bulbs
· Must be specifically labeled dimmable
· Often less stable than LED or incandescent
Incompatible setups can cause:
· Flickering
· Buzzing
· Limited dimming range
Load/Wattage Requirements
Make sure the dimmer’s maximum wattage rating is higher than the total wattage of the bulbs it controls.
Common Problems & Fixes
Flickering Lights
Usually caused by:
· Non-dimmable LED bulbs
· Incompatible dimmer type
Buzzing Noise
Often caused by:
· Overloaded dimmer
· Low-quality or mismatched dimmer switch
Dimmer Not Working
Check:
· Wiring connections
· Breaker status
· Proper hot/load wire placement
Limited Dimming Range
Usually due to:
· Incorrect bulb type
· Incompatible dimmer technology
Dimmer switches occupy more space in the electrical box than standard switches, and improper installation can violate electrical code.
Before You Begin
- Turn off the breaker and verify power is off with a voltage tester.
- Confirm your switch box has enough box fill volume for the dimmer and all wires.
- Ensure the dimmer is rated for the bulb type (LED, incandescent, CFL).
- Follow National Electrical Code (NEC) best practices for grounding and wire insulation.
Neutral Requirements
Some modern and smart dimmers require a neutral wire.
If your home wiring is older and lacks a neutral, you may need:
- A dimmer specifically designed for “no-neutral” installations
- Or a licensed electrician to run a neutral
A dimmer switch is an electrical device used to adjust the brightness level of lighting in a room. Unlike traditional light switches that merely turn lights on or off, dimmer switches allow you to control the intensity of the light, offering a range of illumination levels from very dim to full brightness. This capability not only enhances the ambiance and mood of any given space but also contributes to energy savings. By reducing the brightness of the lights, you will lower the energy consumption and extend the lifespan of the light bulbs, making dimmer switches a cost-effective lighting solution.
Dimmer switches are very versatile and can be used with various lighting fixtures, making dimmer switches a valuable addition to any home or commercial setting. Installing a dimmer switch involves several steps, and it is crucial that you follow proper procedures to ensure safety and functionality. The first step is to turn off the power at the circuit breaker to avoid any risk of electric shock.
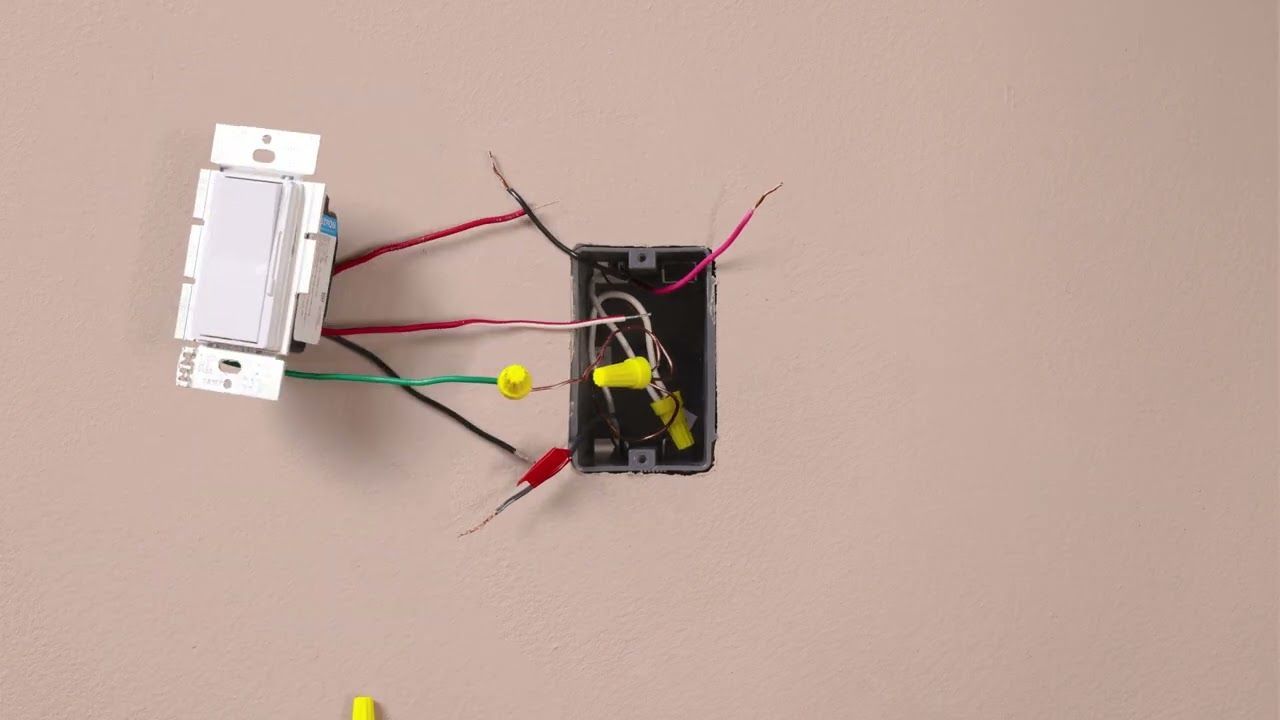
Next, you must remove the existing light switch by unscrewing it from the wall and disconnecting the wires. Once the old switch is removed, you can connect the wires from the wall to the corresponding terminals on the dimmer switch. Following the manufacturer's instructions on correctly wiring the switch is essential. After the cables are securely connected, you can install the dimmer switch into the wall box and screw it into place.
Finally, you can turn the power back on and test your new dimmer switch to ensure it operates smoothly with any light fixture you have connected. Remember, safety is paramount throughout this process, and following the correct steps will ensure a secure and functional installation.
When choosing a dimmer switch, it's crucial to consider compatibility with your existing lighting system. Not all light bulbs are designed to work with dimmers, so make sure your lighting fixtures and bulbs are dimmable. There are dimmer switches that are designed specifically for LED lights, while others are suitable for incandescent or halogen bulbs. Ensuring compatibility will help you achieve optimal performance and avoid any potential issues. In summary, a dimmer switch is a practical and stylish way to control lighting in any environment.
Whether you want to create a cozy atmosphere in your living room or adjust the light levels in your office, installing a dimmer switch can provide flexibility and efficiency. You can enjoy the awesome benefits of customized lighting control, including enhanced ambiance, energy savings, and extended bulb lifespan, by following proper installation steps and ensuring compatibility with your lighting system. Any problems, Call ACDC-Electric at 970-330-1656
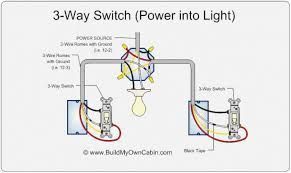
If two switches control the same light, you need a 3-way dimmer and a companion switch.
Identify Wires
- Common wire (black or labeled COM)
- Two traveler wires (usually red & black, or both red)
- Ground
Wiring Steps
- Turn off power at the breaker.
- Remove the existing 3-way switch.
- Identify the common wire—it will be on a differently colored screw.
- Connect wires to the dimmer:
- Common → Black dimmer lead
- Travelers → Red & Red/White leads
- Ground → Green wire
- Install the matching companion switch at the second location.
- Restore power and test dimming and switching from both locations.
Tip:
Label the common wire before disconnecting—it prevents 90% of 3-way installation mistakes.
Installing and wiring a dimmer switch is a straightforward process that can benefit your home's lighting system, offering enhanced ambiance control and energy savings. Most DIY enthusiasts with basic electrical knowledge can accomplish this task. However, safety should always be the top priority. First, ensure your safety by turning off the power to the circuit you will work on at the main electrical panel. This precaution is crucial to prevent any accidental electric shocks. When the power is off, remove the existing switch plate cover with a screwdriver.
Once the cover is off, unscrew the screws holding the old switch in place and gently pull it out from the electrical outlet box. Be careful when disconnecting the wires attached to the old switch by loosening the terminal screws or by removing any wire connectors. It's crucial to understand how the wires were hooked up, as this knowledge will guide you in connecting them to the new dimmer switch. Most dimmer switches have three wires: a ground wire (usually green), a hot wire (typically black), and a load wire (which can also be black or another color).
Sometimes, there may be an additional wire for 3-way switch setups. To install the dimmer switch, connect the ground wire from the dimmer switch to the ground wire in the electrical box using a wire connector. Next, connect the hot and load wires from the dimmer switch to their corresponding wires in the electrical box, again using wire connectors. Ensure all connections are secure and that there are no exposed wires that could cause a short circuit. Once all wires are connected, carefully tuck them right back into the electrical box, ensuring no wires are pinched or damaged in the process. Tighten the dimmer switch to the electrical box with screws, then attach the switch plate cover.
Before restoring power, ensure everything is adequately secured and that there are no loose connections. It's essential to thoroughly test your new dimmer switch by adjusting the slider or rotating knob to ensure that it smoothly controls the light's brightness. You have successfully installed and wired your new dimmer switch if everything functions correctly. This upgrade improves lighting flexibility and contributes to energy efficiency in your home. For further assistance or if you encounter any issues during installation, consider consulting a professional electrician like those at ACDC-Electric for expert guidance and support. Any problems, Call ACDC-Electric at 970-330-1656
How Does a Dimmer Switch Work?
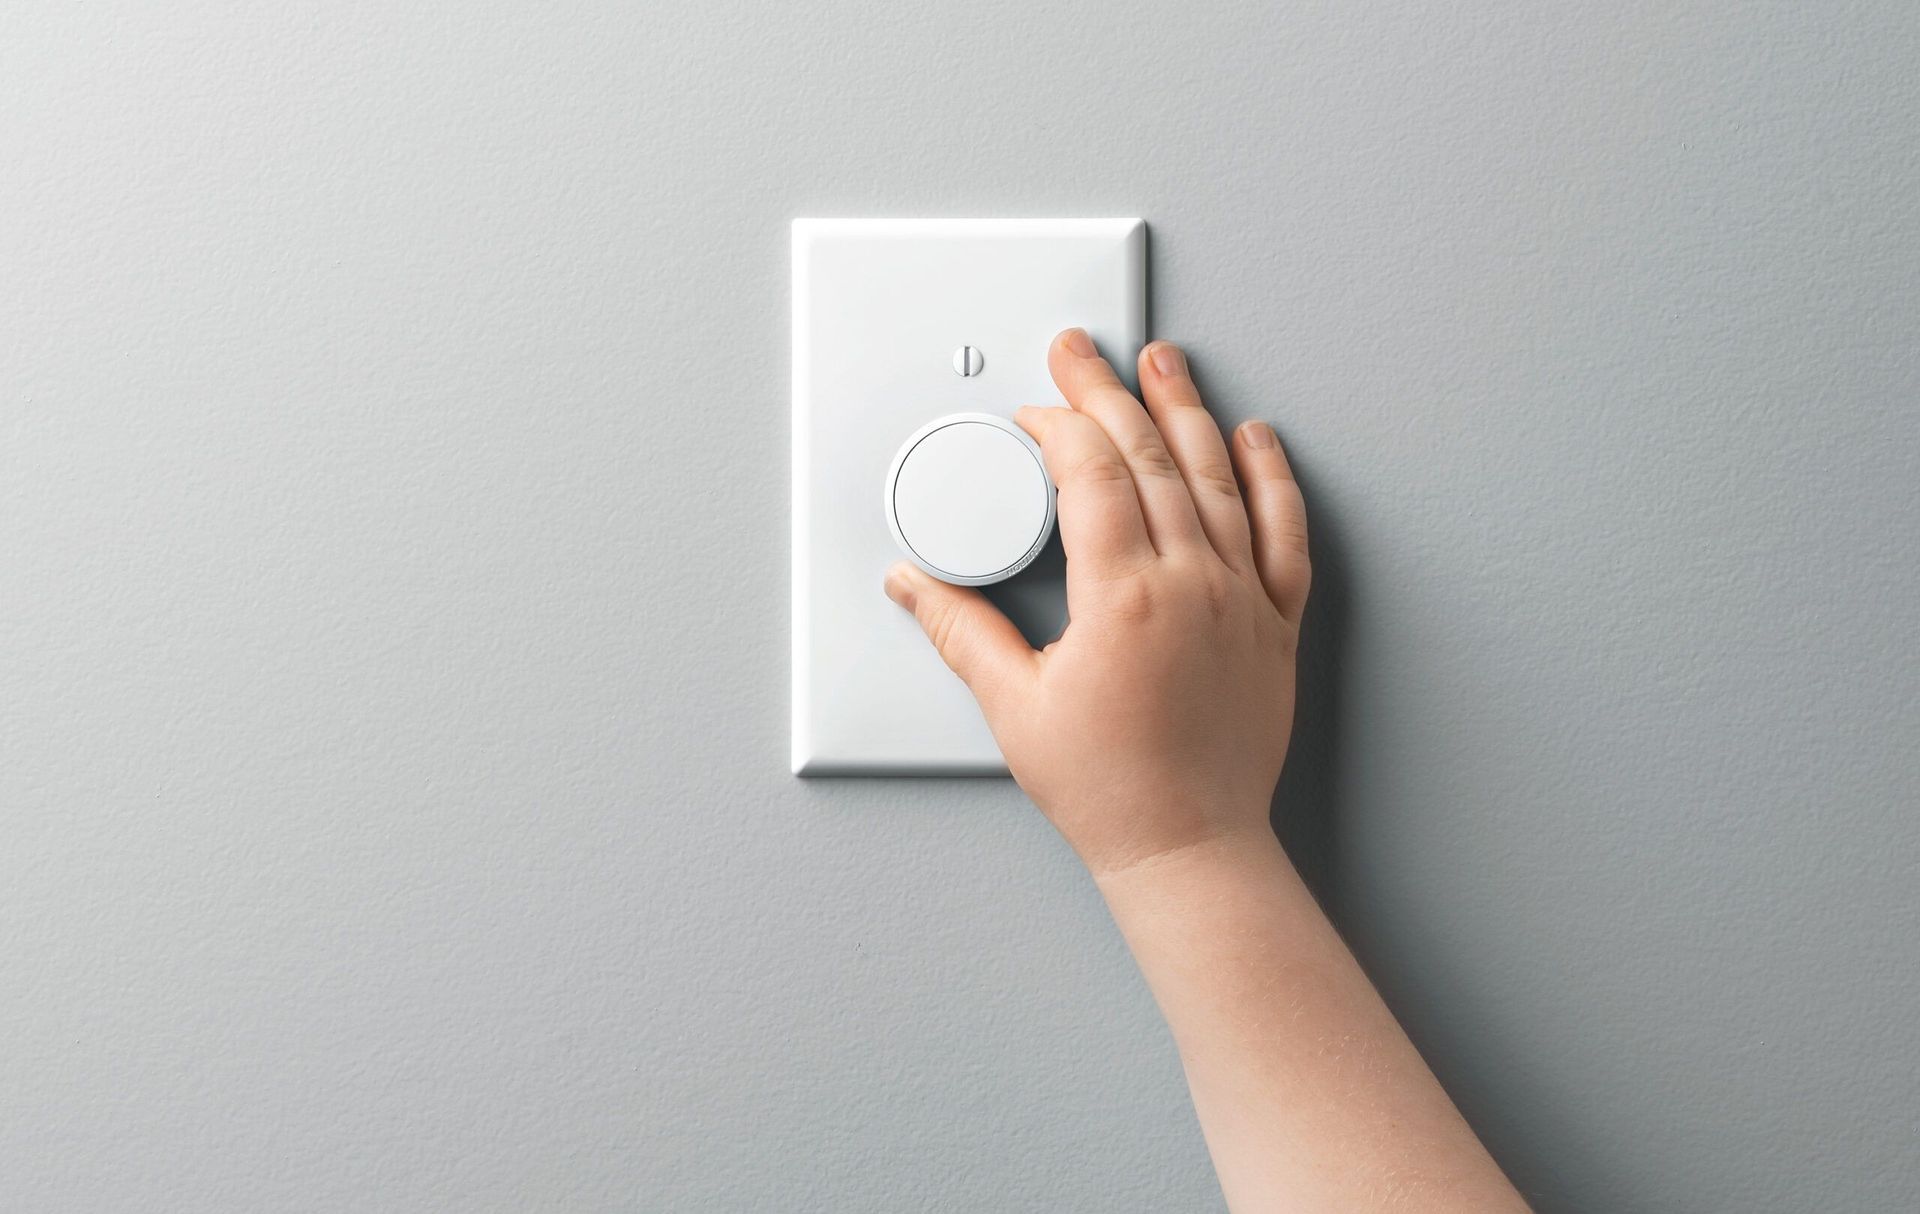
A dimmer switch allows a homeowner or business owners to control the brightness level of your lighting fixtures, providing both aesthetic flexibility and energy efficiency in your home or workspace. By adjusting the intensity of your lights, it helps reduce energy consumption and extend the life of your light bulbs, leading to potential cost savings on your electricity bills and replacement bulbs. The basic function of a dimmer switch involves varying the voltage waveform applied to the light bulb. Several types of dimmer switches are available, including rotary, sliding, and touch-sensitive models, each designed to suit different preferences and installation scenarios.
Understanding how a dimmer switch works can help you decide which type to install and how to wire it correctly. When you choose to install a dimmer switch, ensuring it is compatible with your existing lighting system is essential. Traditional incandescent and halogen bulbs work well with most dimmers, but if you’re using LED or CFL bulbs, you’ll need a dimmer specifically designed for those lights.
The dimmer switch installation typically only involves turning off the power at the circuit breaker, removing the existing switch, and then connecting the new dimmer switch. You'll need to carefully hook up the wires according to the manufacturer's instructions, usually connecting the ground wire first, followed by the live and neutral wires. Secure all connections with wire nuts and ensure no exposed wires before reattaching the switch plate. The internal mechanism of a dimmer switch can vary. For instance, a leading-edge dimmer uses a TRIAC (triode for alternating current) to chop off part of the AC waveform, effectively reducing power to the lamp.
On the other hand, trailing-edge dimmers use MOSFETs (metal-oxide-semiconductor field-effect transistors), which are more suitable for modern LED and CFL bulbs. Understanding these light bulb distinctions can guide you in selecting the most appropriate dimmer for your needs and ensuring it will function correctly with your lighting setup. After installing a dimmer switch, testing is crucial to confirm that everything works as expected. This step is not just a formality, but a reassurance that your installation is correct and your system is safe.
Turn on the power at the circuit breaker and gradually adjust the dimmer from low to high settings to ensure smooth operation. Proper dimmer installation enhances functionality and extends the lifespan of your lighting fixtures by reducing wear and tear.
In summary, a dimmer switch is not just a tool for controlling your lighting environment, but a means to create a personalized and comfortable space.
It effectively controls your lighting environment while saving energy and extending bulb life. When you install one, choose the right type based on your bulb compatibility and follow proper wiring procedures to ensure safety and effectiveness. By understanding how a dimmer switch works and how to hook it up and connect it correctly, you can enjoy customized lighting that meets your needs perfectly. Any problems, Call ACDC-Electric at 970-330-1656
Step-by-Step: How to Install a Dimmer Switch
1. Turn Off Power
Shut off the correct breaker and confirm with a voltage tester that no power is present.
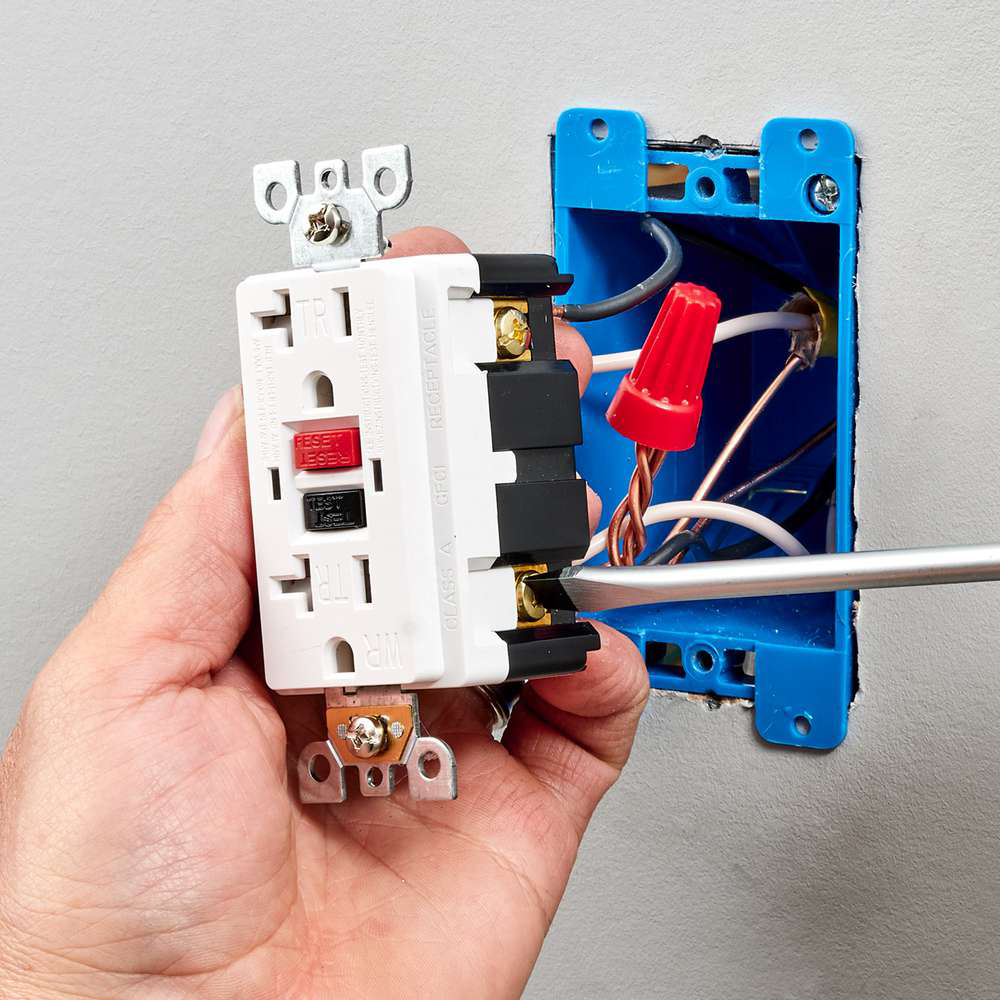
2. Remove the Existing Switch
· Remove the wall plate
· Unscrew the switch
· Carefully pull it out from the electrical box
Tip: Take a photo of the wiring before disconnecting anything.
3. Identify the Wires
Typical wiring colors:
· Black = hot or load
· White = neutral (if present)
· Bare copper/green = ground
Older homes in Greeley may not always follow modern color standards, so verify carefully.
4. Disconnect the Old Switch
Remove wires by loosening screws or releasing backstab connectors.
5. Connect the Dimmer Switch
Match wires carefully:
· Dimmer hot wire → house hot wire
· Dimmer load wire → wire going to the light fixture
· Ground wire → green screw or copper ground
If your dimmer requires neutral:
· Connect white dimmer wire → neutral bundle in box
Secure all connections tightly with wire nuts.
6. Mount the Dimmer
· Carefully fold wires into the electrical box
· Screw the dimmer into place
· Attach the faceplate
7. Restore Power and Test
Turn the breaker back on and test the dimmer:
· Check full brightness range
· Look for flickering or buzzing
· Confirm smooth on/off operation
3-Way Dimmer Switch Installations (Two Switch Locations)
If your light is controlled from two switches:
· Only ONE switch is replaced with a dimmer
· The second becomes a companion switch
· Traveler wires must be correctly identified
· Wiring must match manufacturer instructions exactly
This type of installation is more complex and may require a professional electrician in Greeley, CO.
Why Dimmer Switches Are Worth It
Installing a dimmer switch provides real benefits:
· Lower energy usage (especially with LED lighting)
· Longer bulb lifespan
· Better lighting control for mood and tasks
· Improved home comfort and aesthetics
Installing a dimmer switch is a fantastic way to enhance the ambiance of any room, but safety should always be the top priority. By allowing you to adjust the lighting to your preference, a dimmer switch can significantly improve your living space. It also contributes to energy savings and extends the life of your light bulbs. If you're considering this project, follow these straightforward steps to ensure a safe and correct dimmer switch installation. Remember, the first step is to turn off the power at the circuit breaker to avoid any risk of electric shock. Then, you can begin by removing the existing switch plate cover.
Unscrew the mounting screws of the old switch and carefully pull it out from the wall. There should be three wires connected to the switch: a black or hot wire, a white or neutral wire, and a green or bare ground wire. Please note how these wires are connected, as you will need to connect them to your new dimmer switch similarly. Go ahead and disconnect the wires from the old switch by loosening the screws that hold them in place. Next, prepare your new dimmer switch for installation.
Most dimmer switches come with wire nuts or connectors for easy installation. Begin by connecting the ground wire (usually green or bare copper) from the wall box to the corresponding wire on the dimmer switch. Secure this connection using a wire nut. Then, hook up the black wire from the wall box to one of the black wires on the dimmer switch using another wire nut. Finally, connect the other remaining black wire from the dimmer switch to either the black or red wire from the wall box.
Once all the dimmer switch connections are made securely, carefully tuck the wires back into the wall box and screw the dimmer switch into place with the provided mounting screws. Attach the faceplate over the switch. The faceplate not only provides a neat finish to the installation but also acts as a safety barrier, preventing accidental contact with the live wires. Turn on the power at the circuit breaker. Test your new dimmer switch by adjusting it to ensure it works correctly.
Following these steps, you can install a dimmer switch and enjoy customizable lighting in your home. Remember, if you feel unsure about handling electrical wiring or if complications arise, it is always wise to consult with a professional electrician like ACDC-Electric to avoid any hazards and ensure a proper installation. Any problems, Call ACDC-Electric at 970-330-1656
How to Hook up a Dimmer Switch
A dimmer switch is a powerful light tool that puts you in control of the brightness or evenness of your lights, allowing you to create the perfect ambiance and light source for any room or occasion. To install a dimmer switch, follow our straightforward steps while ensuring safety precautions are in place. Always start by turning off the power at the circuit breaker to prevent any electrical hazards. Once the power is off, remove the existing light switch plate and unscrew the old switch from the electrical box. Carefully pull out the switch and one by one disconnect the wires.
Next, you'll need to install the new dimmer switch. Start by connecting the electrical box wires to the dimmer switch's corresponding wires. Typically, this involves attaching the black (hot) wire to the black or red wire on the dimmer switch, and connecting the ground wire (usually green or bare copper) to the green ground screw or wire on the dimmer. If your dimmer switch has a neutral wire (white), connect it to the white wires in the electrical box. Use wire nuts to secure these connections and ensure there are no exposed wires that could cause a short circuit.
Once all wires are securely connected, very carefully put them back into the electrical box and screw the dimmer switch into place. Attach the faceplate over the switch and turn the power back on at the circuit breaker. Test your new dimmer switch by turning it on and adjusting the brightness levels to ensure everything operates smoothly. If you encounter any issues, double-check your connections and consult the dimmer switch's installation guide for troubleshooting tips. When installing a dimmer switch, it’s crucial to use high-quality components from reputable brands such as Lutron, Leviton, Legrand, GE, Shelly, Skylink, ELEGRP. This ensures reliability and longevity in your electrical setup.
Consider whether you need a single-pole or three-way dimmer based on your lighting configuration. Single-pole dimmers are used where one switch controls a light, while three-way dimmers are used when two switches control one light. In conclusion, hooking up a dimmer switch is a manageable DIY project that can significantly enhance your home’s lighting experience.
You can install a dimmer switch safely and effectively by following these steps and using quality products like those from Lutron, Leviton, Legrand, GE, Shelly, Skylink, ELEGRP Dimmer Switches.. Always prioritize electrical safety by turning off power at the breaker and double-checking all wire connections before completing your installation. Remember, safety is paramount in any electrical project. Any problems, Call ACDC-Electric at 970-330-1656
How to Connect a Dimmer Switch?
Connecting a dimmer switch can enhance the ambiance of any room by allowing you to adjust the room lighting to suit your mood or needs. The first step to this exciting improvement is to make certain the power to the circuit you will work on is turned off at the breaker panel. This is crucial for safety. Once the power is off, remove the existing light switch cover plate and unscrew the switch from the wall box. Carefully pull the old switch out, noting how the wires are connected.
Typically, you will see two black wires (hot wires), and sometimes a green or bare copper wire (ground wire). Next, prepare your dimmer switch for installation. Most modern dimmer switches come with wire leads attached. If your dimmer switch does not have wire leads, you may need to attach them using wire connectors. Connect the dimmer switch by matching the wires from the wall box to the corresponding wires on the dimmer: black to black (hot), and green or bare copper to green (ground). If your setup includes a neutral wire (typically white), connect it.
Secure all connections with wire nuts, ensuring there are no exposed wires. Once all wires are securely connected, carefully put them back into the wall box and screw the dimmer switch into place. Attach the cover plate over the switch. The result of this process will be a beautifully lit room that you can control to your liking. Double-check all connections before turning the power back on to ensure they are tight and secure. Then, restore power at the breaker panel and test your new dimmer switch by adjusting the lighting levels.
If you encounter any issues while trying to connect your dimmer switch, consulting with a professional electrician like those at ACDC-Electric may be beneficial. Proper dimmer switch installation is key to ensuring both functionality and safety. Remember that working with electrical components can be hazardous if you are not fully confident in your abilities. Always exercise caution and be aware of the potential risks involved. These steps will help you successfully install and connect your dimmer switch, giving you greater control over your lighting environment. Any problems, Call ACDC-Electric at 970-330-1656
How to Add a Dimmer Switch?
Adding a dimmer switch to your home lighting system is a great way to enhance the ambiance of your living space while also saving energy. Are you aware with a dimmer switch, you can create a cozy atmosphere or reduce energy consumption, making it an effective solution that can enhance both functionality and aesthetics in your home. To install a dimmer switch, you will need a few tools and materials, including a new dimmer switch, wire connectors, and potentially a voltage tester.
Begin by turning off the power to the existing light switch at your circuit breaker to ensure safety. Remove the light switch cover plate and unscrew the existing switch from the electrical box. Carefully pull out the switch and identify the wires connected to it. Once the old switch is removed, you can hook up the new dimmer switch. First, connect the wires from the wall to the corresponding wires on the dimmer switch.
Typically, this involves attaching the black wires (hot wires) and securing them with wire connectors. If your dimmer switch has a ground wire (usually green or bare copper), attach it to the grounding screw or wire in your electrical box. Follow the manufacturer's instructions closely when connecting wires to ensure proper installation. After all wires are securely connected, gently push the wires back into the electrical box and screw the dimmer switch into place. Attach the cover plate and restore power at the circuit breaker.
Test the new dimmer switch by turning it on and adjusting the light level to ensure it works correctly. Double-check your connections or consult a professional electrician for assistance if you encounter any issues. Remember, installing a dimmer switch can be straightforward if you follow these steps carefully. However, if you are unsure about any aspect of the process, it is always best to seek professional help to ensure safety and proper installation. Whether you want to create a cozy atmosphere or reduce energy consumption, adding a dimmer switch is an effective solution that can enhance both functionality and aesthetics in your home. Any problems, Call ACDC-Electric at 970-330-1656
How to Replace a Dimmer Switch?
Replacing a dimmer switch is a straightforward process that guarantee's to significantly enhance the ambiance of any room by allowing you to adjust the lighting to your preference. Before beginning, ensure the electricity is turned off at the breaker to avoid electrical hazards. Start by removing the existing switch plate and unscrewing the mounting screws to detach the old switch from the wall. Carefully pull out the switch to expose the wires behind it.
Note how these wires are connected; typically, you will find a ground wire, a hot wire, and one or two load wires. Next, disconnect the wires from the old dimmer switch. It's a rule to always use the voltage tester to confirm that no power is running through the wires before proceeding. Once confirmed, connect the new dimmer switch by attaching each wire according to the manufacturer's instructions. Remember, the manufacturer's instructions are your best guide for a safe and effective installation.
Generally, you need to connect the ground wire to the green or copper screw on the dimmer, the hot wire to the black or red screw, and the load wires to their respective terminals. After ensuring all connections are secure, gently push the wires back into the electrical box and screw the new dimmer switch into place. Install the switch plate over the dimmer switch and tighten it with screws.
Finally, turn the power back on at the breaker and test your new dimmer switch to ensure it works correctly with any light fixture it controls. This step is crucial as it confirms the success of your installation. Reading through the instruction manual with your new dimmer switch for specific details related to your model is essential. Additionally, if you are not confidentor have Any Problems, Call ACDC-Electric at 970-330-1656
A smart switch is a sophisticated electrical device that offers convenience, control, and energy efficiency in modern homes and buildings. Unlike traditional switches, a smart switch can be controlled remotely via a smartphone app or a home automation system. This allows users to turn on or off any light, adjust brightness, and set schedules from anywhere, providing unparalleled flexibility and control. Smart switches often come with additional features such as a dimmer switch function, which enables users to fine-tune the lighting intensity to suit different activities or moods.
The installation of a smart switch is a straightforward process that typically involves connecting it to your existing electrical wiring. This process includes replacing your current switch with the smart switch and ensuring the connections are secure. While the installation can be manageable for those familiar with basic electrical work, it's advisable to consult an electrician if you're unsure about handling wires and circuits. Once installed, the smart switch can be integrated into your home network, allowing seamless operation through voice commands or mobile applications.
Smart switches are compatible with various light fixtures, making them versatile additions to any room. A smart switch can manage any light connected to its circuit, whether you want to control overhead lighting, lamps, or outdoor lights. By incorporating smart switches into your home, you can enhance convenience, improve energy efficiency, and create a more personalized living environment. With their ability to connect to other smart devices and systems, smart switches are integral components of modern smart homes and contribute significantly to your living space's overall functionality and comfort. Any problems, Call ACDC-Electric at 970-330-1656
Wiring a 3-way dimmer switch is a game-changer, offering unparalleled flexibility and convenience to any room. This upgrade allows you to control the lighting ambiance with precision, adding a touch of elegance to your home. To successfully install a 3-way dimmer switch, it's essential to understand its fundamental principles and follow a structured process. Make sure the power supply is turned off to avoid any electrical hazards.
Carefully remove the faceplates and unscrew the existing switches from their electrical boxes. Identify the three wires: the standard (usually black), traveler (often red or black), and ground (green or bare copper). When connecting the cables, start by attaching the ground wire to the green screw on the dimmer switch. Next, connect the standard wire to the black screw on the dimmer, ensuring a secure fit for proper operation.
The traveler wires should be connected to the brass or silver screws on the dimmer switch. Once all connections are secure, while carefully tucking the wires back into the electrical box and screw the dimmer switch in place. Install the faceplate and restore power to test your new setup. If done correctly, you should be able to control your lights from two switches, with one being a dimmer.
Throughout this process, following all safety guidelines and referring to manufacturer instructions specific to your dimmer switch model is crucial. If you're uncertain or uncomfortable with performing electrical work, it's always wise to consult with or hire a professional electrician like AC-DC-Electric at 970-330-1656 to ensure safe and proper installation. By correctly wiring a 3-way dimmer switch, you can enhance your lighting system's functionality and aesthetic appeal, providing versatile control over your home's illumination.
Lutron Dimmer Switch
The Lutron Dimmer Switch is an innovative device that gives users precise control over their lighting environment. This advanced dimmer switch allows individuals to adjust the brightness of their lights to create the perfect ambiance for any occasion. One of the key features of the Lutron Dimmer Switch is its compatibility with 3-way wiring configurations.
This means the dimmer switch can be used with another switch to control a single light fixture from two locations, providing added convenience and flexibility. Users must ensure their electrical wiring is compatible with the installation of the Lutron Dimmer Switch. The dimmer switch can be connected to an AC or DC power source, making it versatile for various applications.
To ensure safety, turning off the power at the circuit breaker before beginning the installation process is essential. Once the power is off, users can remove the existing switch and carefully connect the wires to the dimmer switch according to the manufacturer's instructions. This typically involves connecting the ground, line, and load wires and securing all wire connections with wire nuts.
Proper installation of the Lutron Dimmer Switch ensures optimal performance and longevity. After securing the cables, users can attach the dimmer switch to the wall box and replace the faceplate. Once everything is in place, the power can be turned back on at the circuit breaker, and the dimmer switch can be tested to ensure it functions correctly. By investing in a Lutron Dimmer Switch, homeowners can enhance their lighting experience, improve energy efficiency, and enjoy greater control over their home's ambiance. Any problems, Call ACDC-Electric at 970-330-1656
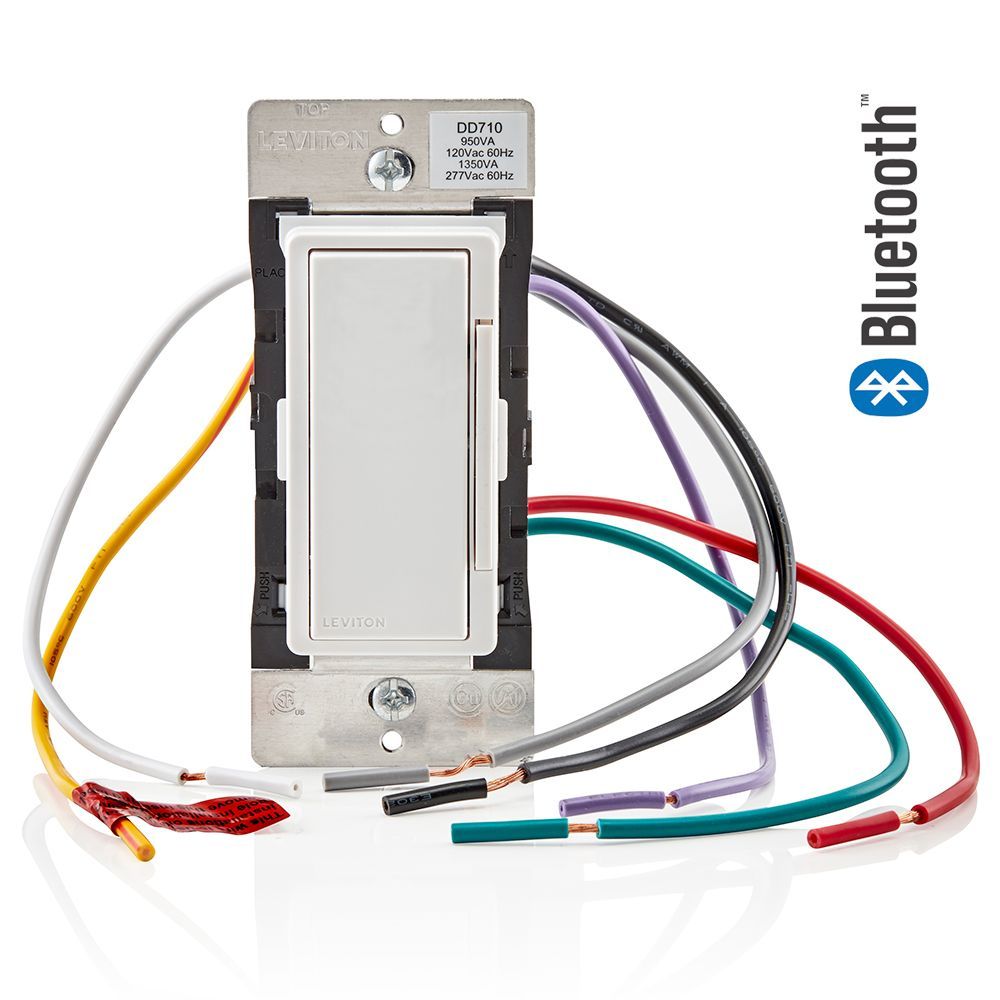
Leviton Dimmer Switch
A Leviton dimmer switch is a versatile and innovative device that allows users to adjust the brightness of their lighting fixtures to create the perfect ambiance in any room. It can be used in various settings, including residential and commercial properties, making it a versatile lighting solution for a wide range of lighting needs. One of the key features of a Leviton dimmer switch is its ability to function as a 3-way switch, enabling control from two different locations. This is particularly useful for homes with larger rooms or spaces with multiple entry points, such as hallways or living rooms. Following a few steps to ensure safety and proper functioning is essential to installing a Leviton dimmer switch.
Begin by turning off the power supply to the existing switch at the circuit breaker. Next, remove the faceplate and unscrew the existing switch from the electrical box. Carefully disconnect the wires, noting their connections for future reference. Take your new Leviton dimmer switch and connect the wires according to the manufacturer's instructions, making sure to attach the black wire to the hot wire, the white wire to the neutral wire, and the green or bare copper wire to the ground. When installing a 3-way Leviton dimmer switch, additional steps are required to ensure proper wiring.
One needs to identify and connect the traveler wires between the switch locations. Ensure that the wiring configuration matches both switches, paying attention to the markings on the dimmer switch terminals. Once connected, secure the dimmer switch back into the electrical box, attach the faceplate, and turn on the power supply. Test the functionality by adjusting the brightness and ensuring both switches work correctly.
Leviton dimmer switches are designed to work with various types of lighting, including incandescent, LED, and CFL bulbs. They feature advanced technology that optimizes performance and energy efficiency, providing users with smooth and flicker-free dimming capabilities and helping to reduce energy costs. Whether you want to create a cozy atmosphere in your living room or enhance productivity in your workspace, a Leviton dimmer switch is an excellent choice for modern lighting control solutions. Any problems, Call ACDC-Electric at 970-330-1656
Legrand Dimmer Switch
The Legrand Dimmer Switch is renowned for its exceptional quality and advanced technology. This dimmer switch is designed to give users precise control over the lighting in their homes or offices, enhancing ambiance and energy efficiency. To install the Legrand Dimmer Switch, the first and most crucial step is to ensure you have turned off the power supply to the circuit you will be working on.
This is a safety measure that cannot be overstated. Carefully remove the existing light switch and disconnect the wires, making sure to track which wire was connected to each terminal. Next, take your new Legrand Dimmer Switch and identify the terminals for wiring. Typically, you must hook up the ground wire first, followed by the line and load wires. ACDC- Electric will make sure that each wire is securely fastened to its corresponding terminal. If you are unsure how to connect the cables correctly, refer to the product's instruction manual or consult a professional electrician. After all wires are correctly connected, carefully tuck them back into the electrical box and secure the dimmer switch with screws.
After securing the switch, attach the faceplate and restore power to the circuit. Test your new Legrand Dimmer Switch by slowly adjusting the dimming level to ensure it operates smoothly. This dimmer switch not only enhances lighting customization but also potentially extends the lifespan of your bulbs by reducing their exposure to full power. Installing a Legrand Dimmer Switch from ACDC-Electric is a pretty straightforward process that can significantly improve the functionality and aesthetic of your lighting systems.
You can do it with confidence, knowing that you have the necessary guidance and safety precautions. Remember, safety is paramount; if you feel uncertain about connecting or wiring the dimmer switch at any point, do not hesitate to seek professional assistance. Any problems, Call ACDC-Electric at 970-330-1656
GE Dimmer Switch
A GE Dimmer Switch is a powerful tool for modern homes, putting the control of lighting levels in the hands of homeowners. This allows you to personalize your indoor lighting brightness according to your preferences and needs. Installing a dimmer switch is relatively simple for those familiar with basic electrical work, but it requires careful attention to detail to ensure safety and functionality. Before installing the dimmer switch, it is crucial to turn off the circuit breaker's power to avoid any electrical shock risk.
Additionally, having a clear understanding of the wiring configuration in your home will help streamline the installation process. To install a GE Dimmer Switch, remove the existing light switch by unscrewing the cover plate and disconnecting the wires. Next, connect the wires from the dimmer switch to the corresponding wires in the electrical box—typically, these will be black (hot), white (neutral), and green or bare copper (ground) wires. Using wire nuts, securely hook up each connection and ensure there are no exposed wires that could potentially cause a short circuit.
Once all cables are connected, carefully tuck them back into the electrical outlet box, screw the dimmer switch into place, and attach the cover plate. It is important to note that not all light fixtures are compatible with dimmer switches. Therefore, verify that your lighting system can support a dimmer before installing. After installing the dimmer switch and restoring power at the circuit breaker, test the switch by gradually adjusting the lighting levels to ensure it works correctly.
If you encounter any issues or uncertainties during installation, consulting with a licensed electrician or referring to ACDC-Electric's professional guidelines can provide valuable assistance. Properly installing a GE Dimmer Switch can enhance the ambiance of your living space while providing energy efficiency and convenience. Any problems, Call ACDC-Electric at 970-330-1656
Shelly Dimmer Switch
The Shelly Dimmer Switch by ACDC-Electric is a versatile and essential for modern lighting solutions. This innovative device allows users to seamlessly adjust the brightness of their lights, creating the perfect ambiance for any setting. Whether you want to install the dimmer switch in your home or office, understanding the proper installation process is crucial for optimal performance. To install the Shelly Dimmer Switch, you should start by making sure the power is turned off at the circuit breaker to prevent any electrical accidents.
Carefully remove the existing switch plate and disconnect the wires attached to the old switch. Next, take the Shelly Dimmer Switch and follow the wiring diagram provided in the manual. Typically, you will need to connect the live wire to the "L" terminal, the neutral wire to the "N" terminal, and the load wire to the "O" terminal on the dimmer switch. It is critical to double-check all connections to ensure they are secure and properly insulated.
After confirming that all wires are correctly connected, gently tuck the wires back into the electrical box and secure the dimmer switch with screws. Once securely in place, restore power at the circuit breaker and test the dimmer switch by gradually adjusting its knob or slider to check for smooth operation. The Shelly Dimmer Switch by ACDC-Electric enhances lighting control and contributes to energy savings by allowing you to reduce light intensity as needed.
With its user-friendly design, which is designed to make the installation process as easy as possible, and straightforward installation process, this dimmer switch is an excellent addition to any lighting system. Remember, if you are uncertain about any step during the shelly switch installation process, it is always advisable to consult a professional electrician to ensure a safe and proper hook-up of your Shelly Dimmer Switch. Any problems, Call ACDC-Electric at 970-330-1656
Skylink Dimmer Switch
The Skylink Dimmer Switch, an innovative device designed to enhance the convenience and ambiance of your living space, ensures your safety as you install it. The skylink dimmer switch allows you to adjust the lighting brightness to suit your needs, whether for a cozy evening or a bright morning. To install the Skylink Dimmer Switch, you must first ensure the power is turned off at the circuit breaker to prevent electrical hazards.
Next, remove the existing switch by unscrewing it from the wall plate. Disconnect the wires connected to the old dimmer switch and prepare them for the new installation. When you are ready to hook up the Skylink Dimmer Switch, start by connecting the dimmer switch wires according to the instructions provided in the manual. Typically, this involves connecting the black wire from the skylink dimmer switch to the hot wire in your electrical box, and then the white wire to the neutral wire.
Secure all connections with wire nuts and carefully put the wires back into the wall box. Once all connections are made, screw the dimmer switch into place and attach the wall plate. Before you complete the installation, double-check that all wire connections are secure and that there are not any exposed wires that could cause a short circuit. After completing these steps, please turn on the power at the circuit breaker and test the dimmer switch to ensure it functions correctly.
The Skylink Dimmer Switch is designed to work seamlessly with various lighting fixtures, providing smooth dimming capabilities and enhancing your overall lighting experience. Following these steps, you can successfully install and connect your Skylink Dimmer Switch and enjoy its benefits for years. Any problems, Call ACDC-Electric at 970-330-1656
ELEGRP Dimmer Switch
The ELEGRP Dimmer Switch is an advanced solution for modern lighting control, offering seamless integration into various residential and commercial environments. This dimmer switch allows users to effortlessly adjust the brightness of their lights, creating the perfect ambiance for any occasion. The installation process is straightforward, even for those with basic electrical knowledge. To install the ELEGRP Dimmer Switch, disconnect the power supply to the circuit where the dimmer switch will be installed.
Carefully remove the existing switch and note how the wires are connected. Identifying the live, load, and ground wires is essential to ensure a proper hookup. When you are ready to connect the ELEGRP Dimmer Switch, begin by attaching the ground wire to the green screw on the dimmer switch. Next, hook up the live wire to one of the black screws and the load wire to the other black screw. Ensure that all connections are secure before carefully placing the dimmer switch into the electrical box and fastening it with screws.
Finally, the faceplate is attached, and power is restored to the circuit. Test the dimmer switch to confirm it functions correctly and that you can smoothly adjust the light levels. The ELEGRP Dimmer Switch is designed to be compatible with a wide range of light bulbs, including LED, CFL, incandescent, and halogen. This versatility makes it an excellent choice for various lighting setups. Its sleek design and intuitive controls make it a valuable addition to any space, providing functionality and aesthetic appeal. With its easy installation process and reliable performance, the ELEGRP Dimmer Switch is a top choice for anyone looking to enhance their lighting control capabilities. Any problems, Call ACDC-Electric at 970-330-1656
Dimmer switches have become increasingly popular for controlling LED lights, offering energy savings and the ability to create the perfect ambiance in any room. It is crucial to ensure compatibility between the switch and the LED fixtures when installing a dimmer switch for LED lights. Most modern LED lights are designed to work with dimmer switches, but double-checking the specifications can prevent any issues. Hooking up a dimmer switch can be straightforward if you follow the proper steps. First, turn off the power at the circuit breaker to avoid any electrical mishaps, ensuring your safety throughout the process.
Then, remove the existing switch plate and disconnect the wires from the old switch. Once the old switch is removed, connect the dimmer switch wires from the wall to the new dimmer switch according to the manufacturer's instructions. Typically, this involves matching and connecting wires by color: black or red for live wires, white for neutral, and green or bare copper for ground.
Secure each wire connection with wire nuts, ensuring no bare wire is exposed. After connecting all wires, carefully put them back into the electrical box and screw the dimmer switch into place. Finally, attach the switch plate cover and turn the power back on at the breaker. Testing your newly installed dimmer switch is essential to ensure proper functionality.
Gradually adjust the dimmer to see how it affects your LED lights. You can smoothly transition between different brightness levels if everything is wired correctly. Remember that installing a dimmer switch gives you greater control over lighting and can extend the lifespan of your LED bulbs by reducing their overall usage. With these benefits in mind, taking the time to wire and hook up a dimmer switch properly is a worthwhile investment for any home or office space. Any problems, Call ACDC-Electric at 970-330-1656
3-Way Dimmer Switch
A 3-way dimmer switch is a versatile and convenient device that allows you to control the brightness of your lighting fixtures from multiple locations. Installing a dimmer switch involves several steps to ensure proper functionality and, most importantly, your safety. To start, you must gather the necessary tools and materials, including the dimmer switch, wire strippers, screwdrivers, and electrical tape.
Begin by turning off the power to the circuit you will work on to prevent electrical hazards. Next, remove the existing light or dimmer switch cover plate and unscrew the mounting screws that hold the switch in place. As you carefully pull out the old switch and disconnect the wires connected to it, pay close attention to how the wires are connected to the old switch. This observation is crucial as it will guide you in connecting the new dimmer switch. Typically, a 3-way dimmer switch will have three wires: one standard wire (usually black), one wire for the traveler (often red), and one ground wire (green or bare copper).
To install the new dimmer switch, first go ahead and connect the ground wire to the green screw on the dimmer switch. Then, hook up the standard wire to the black screw and connect the traveler wires to the remaining screws. Ensure all connections are secure and adequately insulated with electrical tape if necessary. Once all wires are connected put the wires back into the electrical box and mount the dimmer switch using the provided screws.
After securing the dimmer switch, attach the cover plate and turn on the power to test your installation. Adjusting the dimmer switch should now allow you to control the lighting intensity smoothly. Properly installed, a 3-way dimmer switch enhances functionality and ambiance in any room, providing easy control over lighting levels from multiple locations. Any problems, Call ACDC-Electric at 970-330-1656
Three Way Dimmer Switch
A three-way dimmer switch is a versatile and convenient device that empowers users to control the lighting levels from multiple locations within a room. Ideal for large spaces such as living rooms, hallways, or staircases, this switch provides the flexibility to adjust light intensity per the ambiance or activity requirements. To install a three-way dimmer switch, it is essential to understand the wiring and connection processes involved.
This typically includes identifying the standard and traveler wires and ensuring they are correctly hooked to the corresponding terminals on the dimmer switch. Proper installation not only ensures smooth operation but also enhances the longevity of the device. When installing a three-way dimmer switch, safety should be your top priority. Begin by turning off the power to the circuit you will work on to prevent electrical hazards. Next, remove the existing switch cover and disconnect the wires from the terminals. Carefully observe the configuration of cables—usually consisting of a standard wire (often black), two traveler wires (typically red or black), and a ground wire (green or bare copper).
Connect the cables to the new dimmer switch according to the manufacturer's instructions, ensuring all connections are secure and insulated with wire nuts or electrical tape. Once connected, mount the dimmer switch into the wall box, secure it with screws, and attach the cover plate. Testing the functionality of your newly installed three-way dimmer switch is crucial. Turn the power back on and check if you can control the light from both switches smoothly. If everything works correctly, you have successfully installed your dimmer switch.
In case of any issues, double-check all your wiring connections and consult the installation manual for troubleshooting tips. A properly installed three-way dimmer switch not only offers convenience but also helps in enhancing energy efficiency by allowing you to use only as much light as needed. Whether upgrading your existing switches or installing new ones, understanding how to wire and connect a dimmer switch is key to achieving optimal lighting control in your home or office. Any problems, Call ACDC-Electric at 970-330-1656
Lights Flicker When Dimmed
- LED bulbs may not be compatible — replace with “dimmable LED”
- Switch may require a trailing-edge dimmer (ELV type)
Buzzing or Humming
- Dimmer overloaded — reduce total wattage
- Use higher-quality LED bulbs or an ELV dimmer
Dimmer Feels Hot
- Some warmth is normal
- Excessive heat may signal box overcrowding or overload
Lights Won’t Turn Fully Off
- Smart dimmers may require calibration
- Incorrect wiring in 3-way setup
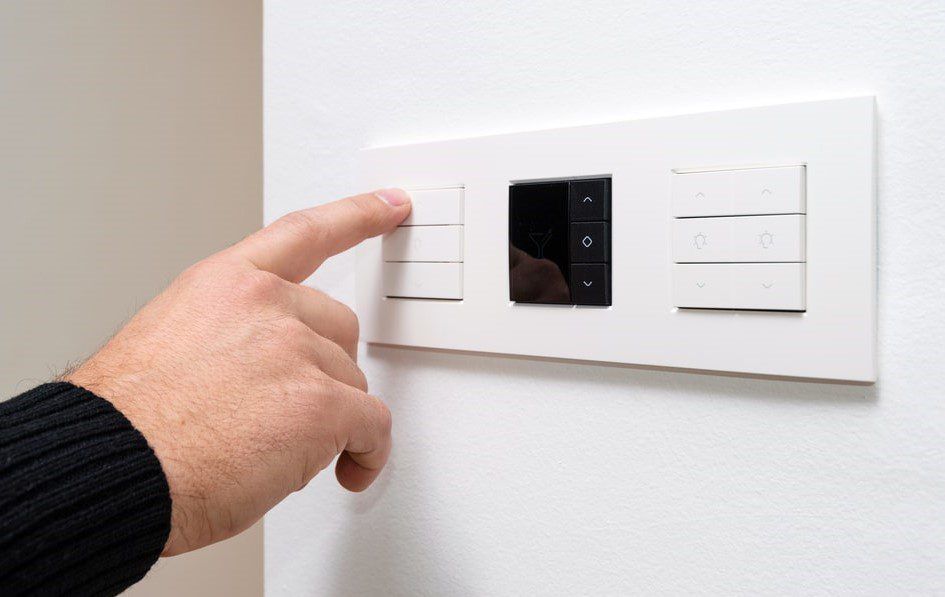
Smart Dimmer Switches & Modern Lighting Control
Smart dimmers support remote control, scheduling, automation, and voice control (Alexa, Google Assistant, Siri).
Smart Dimmer Wiring Requirements
Most smart dimmers require:
- Line (hot)
- Load
- Neutral
- Ground
If your home doesn’t have a neutral, choose a no-neutral smart dimmer (Lutron Caseta, for example).
Advantages of Smart Dimmers
- Energy monitoring
- App-controlled brightness
- Timers & scenes
- Integration with smart home systems
How to Install and Wire a Dimmer Switch: Frequently Asked Questions
Can any light switch be replaced with a dimmer switch, and what wiring do I need?
Not every switch can be replaced with a dimmer. Dimmer switches require the correct wiring—typically a hot (line), load, and ground, and sometimes a neutral wire, depending on the dimmer type. Always check compatibility before installation.
Why do my LED lights flicker on a dimmer switch, and how do I fix LED dimmer flickering?
LED flicker usually happens because your bulbs or dimmer aren’t LED-compatible. Use dimmable LED bulbs and a trailing-edge (ELV) LED dimmer designed specifically for modern LED lighting.
What do I need to install a dimmer switch?
A compatible dimmer switch (ensure it matches your bulb type: LED, CFL, incandescent, halogen, etc.)
Screwdrivers (Phillips and flathead)
Wire strippers
Non-contact voltage tester
Wire connectors (wire nuts)
Electrical tape
Possibly a bulb adaptor (for some no-neutral installations)
What is the best dimmer switch for LED bulbs to prevent buzzing or flickering?
The best dimmers for LEDs are LED-compatible trailing-edge dimmers, which reduce buzzing, flickering, and low-end dropout. Avoid older leading-edge dimmers, which were designed for incandescent bulbs.
Do dimmer switches save electricity and reduce energy usage?
Yes, dimmer switches can reduce energy use by lowering wattage output. When lights are dimmed, they consume less power and extend bulb lifespan—especially with LED lighting.
Can I install a dimmer switch on a 3-way or multi-location lighting circuit?
Yes—but only with a 3-way dimmer designed for multi-location circuits. One switch must be a dimmer, and the other must be a companion or auxiliary switch. Correct wiring of the common and traveler wires is essential.
Why does my dimmer switch get hot, and is it normal for dimmers to heat up?
Some warmth is normal—dimmers dissipate energy as heat. Excessive heat may indicate overloading, incorrect wattage, or poor ventilation inside the switch box. Check the dimmer’s load rating.
How do I fix buzzing lights when using a dimmer switch?
Buzzing typically occurs when bulbs aren’t compatible with the dimmer. Switching to a quality dimmable LED and an ELV dimmer usually eliminates the noise.
When should I call an electrician to install a dimmer switch?
Answer:
Call a licensed electrician if you have:
Unknown or outdated wiring
No neutral wire
Aluminum wiring
A 3-way circuit you can’t identify
Overloaded or overcrowded switch boxes
Do I need a neutral wire for a smart dimmer switch installation?
Most smart dimmers require a neutral wire to power internal electronics. If your home lacks a neutral, choose a no-neutral smart dimmer like Lutron Caseta or a specialized 2-wire smart switch.
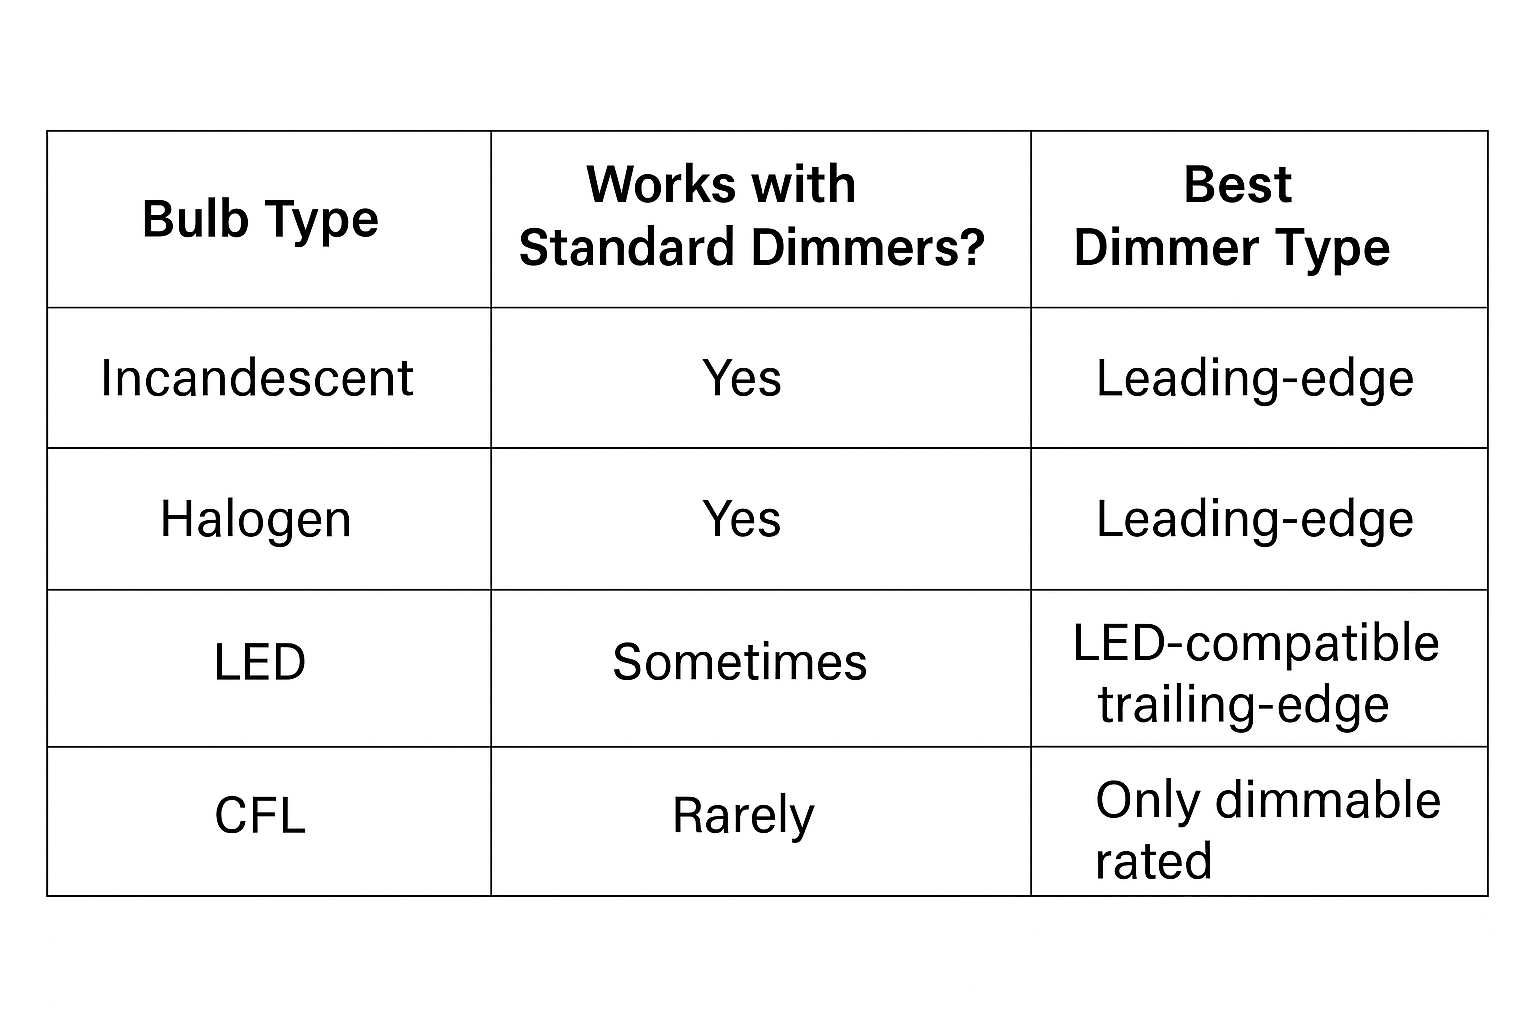
What dimmer switch works best for incandescent vs LED vs CFL bulbs?
Incandescent/Halogen: Standard leading-edge dimmers
LED: LED-compatible trailing-edge dimmers
CFL: Only bulbs marked “dimmable CFL” work correctly
Using the wrong dimmer type results in buzzing, flickering, or failure.
How do I choose the right dimmer switch?
Confirm your bulbs are dimmable and check the dimmer’s compatibility.
Add up the total wattage of the lights the dimmer will control; choose a dimmer rated for at least that wattage.
Identify if you need a single-pole or 3-way dimmer, based on your switch setup
What are the basic steps to install a dimmer switch?
Turn off the power at the breaker to the circuit you'll be working on. Double-check with a voltage tester.
Remove the existing switch by unscrewing the faceplate and switch, then gently pulling it out of the wall.
Note and label the wires before disconnecting them. Take a photo for reference.
Disconnect the old switch and prepare the wires (strip insulation if needed).
Connect the wires to the new dimmer according to the manufacturer’s instructions:
Single-pole: Usually, connect the black (hot) wire to the black on the dimmer, the load (to light) to the dimmer’s red, and ground to ground. Cap any unused wires as directed.
Neutral wire: Some dimmers require a neutral (white) wire, some do not. Refer to your dimmer’s instructions and your home’s wiring.
Ground: Always connect the ground (green or bare copper) wire.
Secure the dimmer in the electrical box, attach the faceplate, and restore power.
Test the dimmer to ensure proper operation
Do I need special wiring for a dimmer switch?
You can install a dimmer wherever there is an existing on/off switch, but the bulbs must be dimmable (check the packaging).
Using non-dimmable bulbs with a dimmer can cause flickering or damage
Can I replace a regular switch with a dimmer switch myself?
Yes, if you are comfortable working with electrical wiring and follow safety precautions.
If unsure, or if your wiring is unusual or outdated, consult a licensed electrician
What safety precautions should I take?
Always turn off power at the breaker before starting.
Use a voltage tester to confirm no current is present.
Ensure all connections are secure and capped.
Never work on live circuits
Troubleshooting Tips
If the dimmer doesn’t work, double-check wiring connections and that the bulbs are dimmable.
If lights flicker or buzz, ensure the dimmer is compatible with your bulb type and wattage.
Other Important Notes
Metal dimmer plates must be properly earthed.
Do not exceed the dimmer’s maximum wattage rating.
Some smart or advanced dimmers may require additional setup or wiring.
If you have specific wiring questions or encounter unusual wire colors or configurations, refer to the dimmer’s manual or consult a professional electrician
Our Experience
At AC-DC Electric, we have been offering both residential, commercial & Industrial electrical services for over four decades. Our experience has taught us the best ways to perform various procedures. Our management and staff have seen electric systems evolve over time and have gained a deeper understanding of how they work. Thanks to our experience, we rarely encounter issues that we have never seen before.
Our knowledge
Each of our electricians and technicians is licensed, certified, and trained to provide high quality services. We understand the importance that electric systems play in both residential and commercial properties. This is why we handpick the best staff who are both knowledgeable and have demonstrated their ability in a variety of situations.
At AC-DC Electric, we foster an environment that encourages excellence. You can count on our electricians and technicians to get the job done with both speed and skill.
Our Transparent Pricing
Dealing with an electrical problem at home can be incredibly distressing, and many electricians and companies are willing to exploit people experiencing such issues by charging them high fees. At AC-DC Electric, we strive to provide high quality electrical services at affordable rates. Our electricians’ specialize in Residential, Commercial & Industrial electrical services. We can also offer you a free estimate before you hire us. This ensures you remain aware of how much you will need to pay before using our electrical services.
If you’re ready to tackle your residential, commercial or Industrial property’s electrical problems quickly, please contact AC-DC Electric today. Our experts are always happy and ready to help residents in Fort Collins, Greeley, Evans, Johnstown, Loveland, Brighton, Commerce City and Denver Call today for a free estimate at 970-330-1656.
You might also like