How to Install & Clean a Bathroom Fan
Proper ventilation is essential to keep your bathroom clean and dry, and having a bathroom fan is a great option to achieve it. However, not everyone knows how to install a bathroom fan, and this task may seem daunting at first. Don’t worry!
In this article, we will provide you with an ultimate guide on how to install and clean a bathroom fan. Follow the step-by-step process, and you'll have a new bathroom fan in no time.
Steps to to Installing a Bathroom Fan
Step 1: Choose the Right Fan
Installing a bathroom fan is necessary in any home, and one of the most important steps is choosing the right fan. The best thing to do first is to check the size of your bathroom and calculate the cubic feet per minute (CFM) that your fan should deliver, as this will help you choose a model that will have enough power to adequately remove steam and odors.
It's also important to look for products with high-quality motors, noise ratings within acceptable levels, and a light feature if desired. With all these factors in place, installing a bathroom fan can be done quickly and easily.
Step 2: Gather the Tools
The second step is to prepare your tools. You will need a wirecutter or stripper, screwdriver, and drill with a masonry bit. Depending on what material your fan is mounted on (i.e., wood or cement), you may also need additional items, such as anchors and screws, to secure the fan.
Make sure you have all of these items ready before continuing to install your new bathroom fan. If you don't already have these tools, you can buy them from a reliable source for a quality product that will last. Nothing ruins a remodeling job like cheap, unreliable supplies!
Step 3: Cut the Hole
Step 3 in installing a bathroom fan is where the work really starts. You will need to locate where on the ceiling you want your fan to be, outlining it with a pencil first. Once you are happy with the placement of your fan, place your drywall saw against the ceiling and cut out a rectangular or square hole as per the manufacturer's instructions.
As you are cutting the hole, avoid creating any other marks or scratches on the ceiling. Otherwise, this may alter your plans for painting and patching up holes when finished cutting. Make sure to clean up all edges of these newly created rectangles for safety reasons!
Step 4: Connect the Wiring
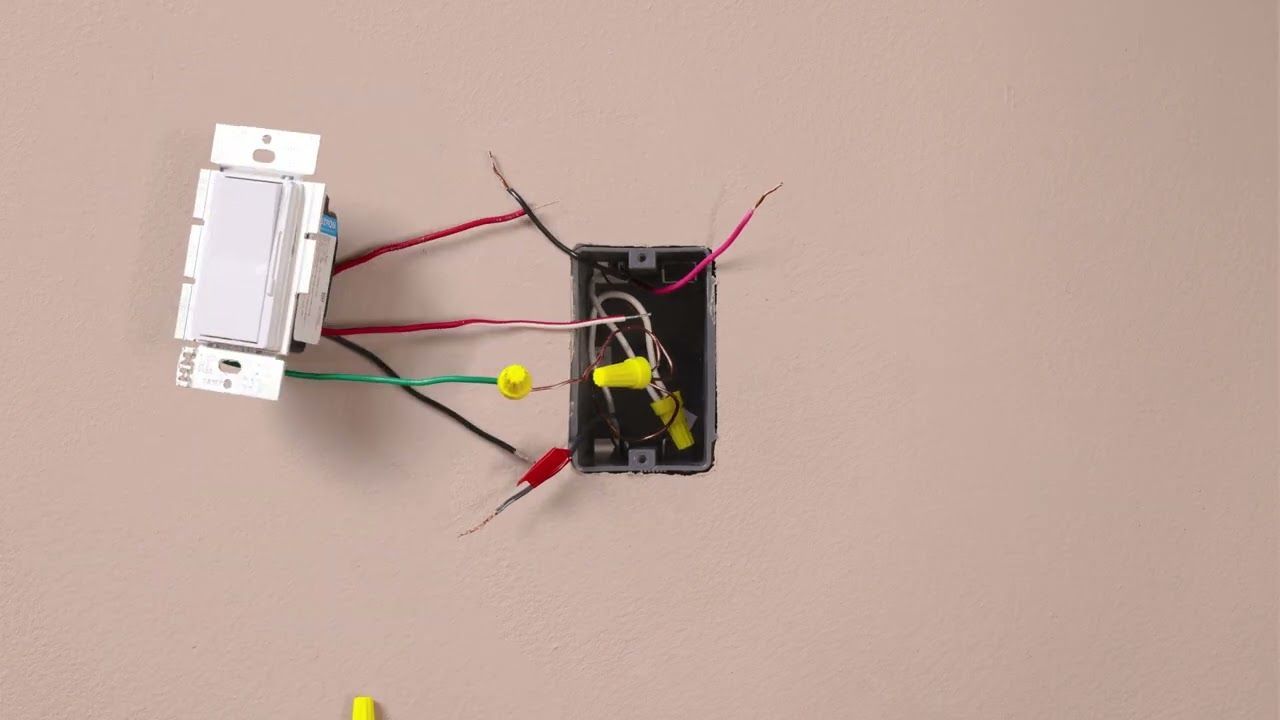
The fourth and final step in installing a bathroom fan is connecting the wiring. To do this, you will need to have some basic knowledge of electrical systems and access to the existing wiring connections in your wall box.
You should make sure to turn off the power before beginning this process, as mishandling any of the wires could result in a dangerous electrical shock. Connecting the wires is fairly straightforward -- just connect each wire one at a time according to the instructions that came with your new fan until all of them are attached.
Make sure they are firmly attached and insulated with electrical tape or cable connectors. After that, double-check your work and then turn on the power to your fan to test it out.
Step 5: Install the Fan
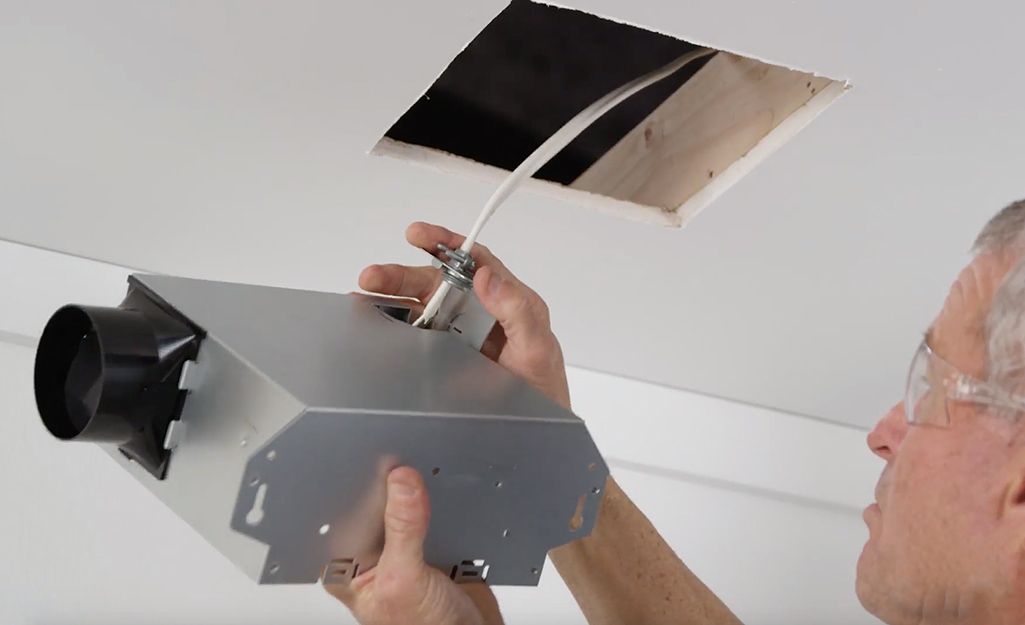
With the frame secured, it is time to install our fan. We will be attaching the fan to the housing. To do that, we’ll need to use the brackets provided for installation. Lift up your fan and secure it on each side with these brackets. Make sure to use screws when doing this, as they will provide a much stronger hold than nails.
Do not overtighten the screws, as they can strip out and create future problems with your fan installation. Once secure, you'll want to pop your power cable into its slot. Now you're ready to test your newly installed bathroom fan!
How to Replace Bathroom Exhaust Fan
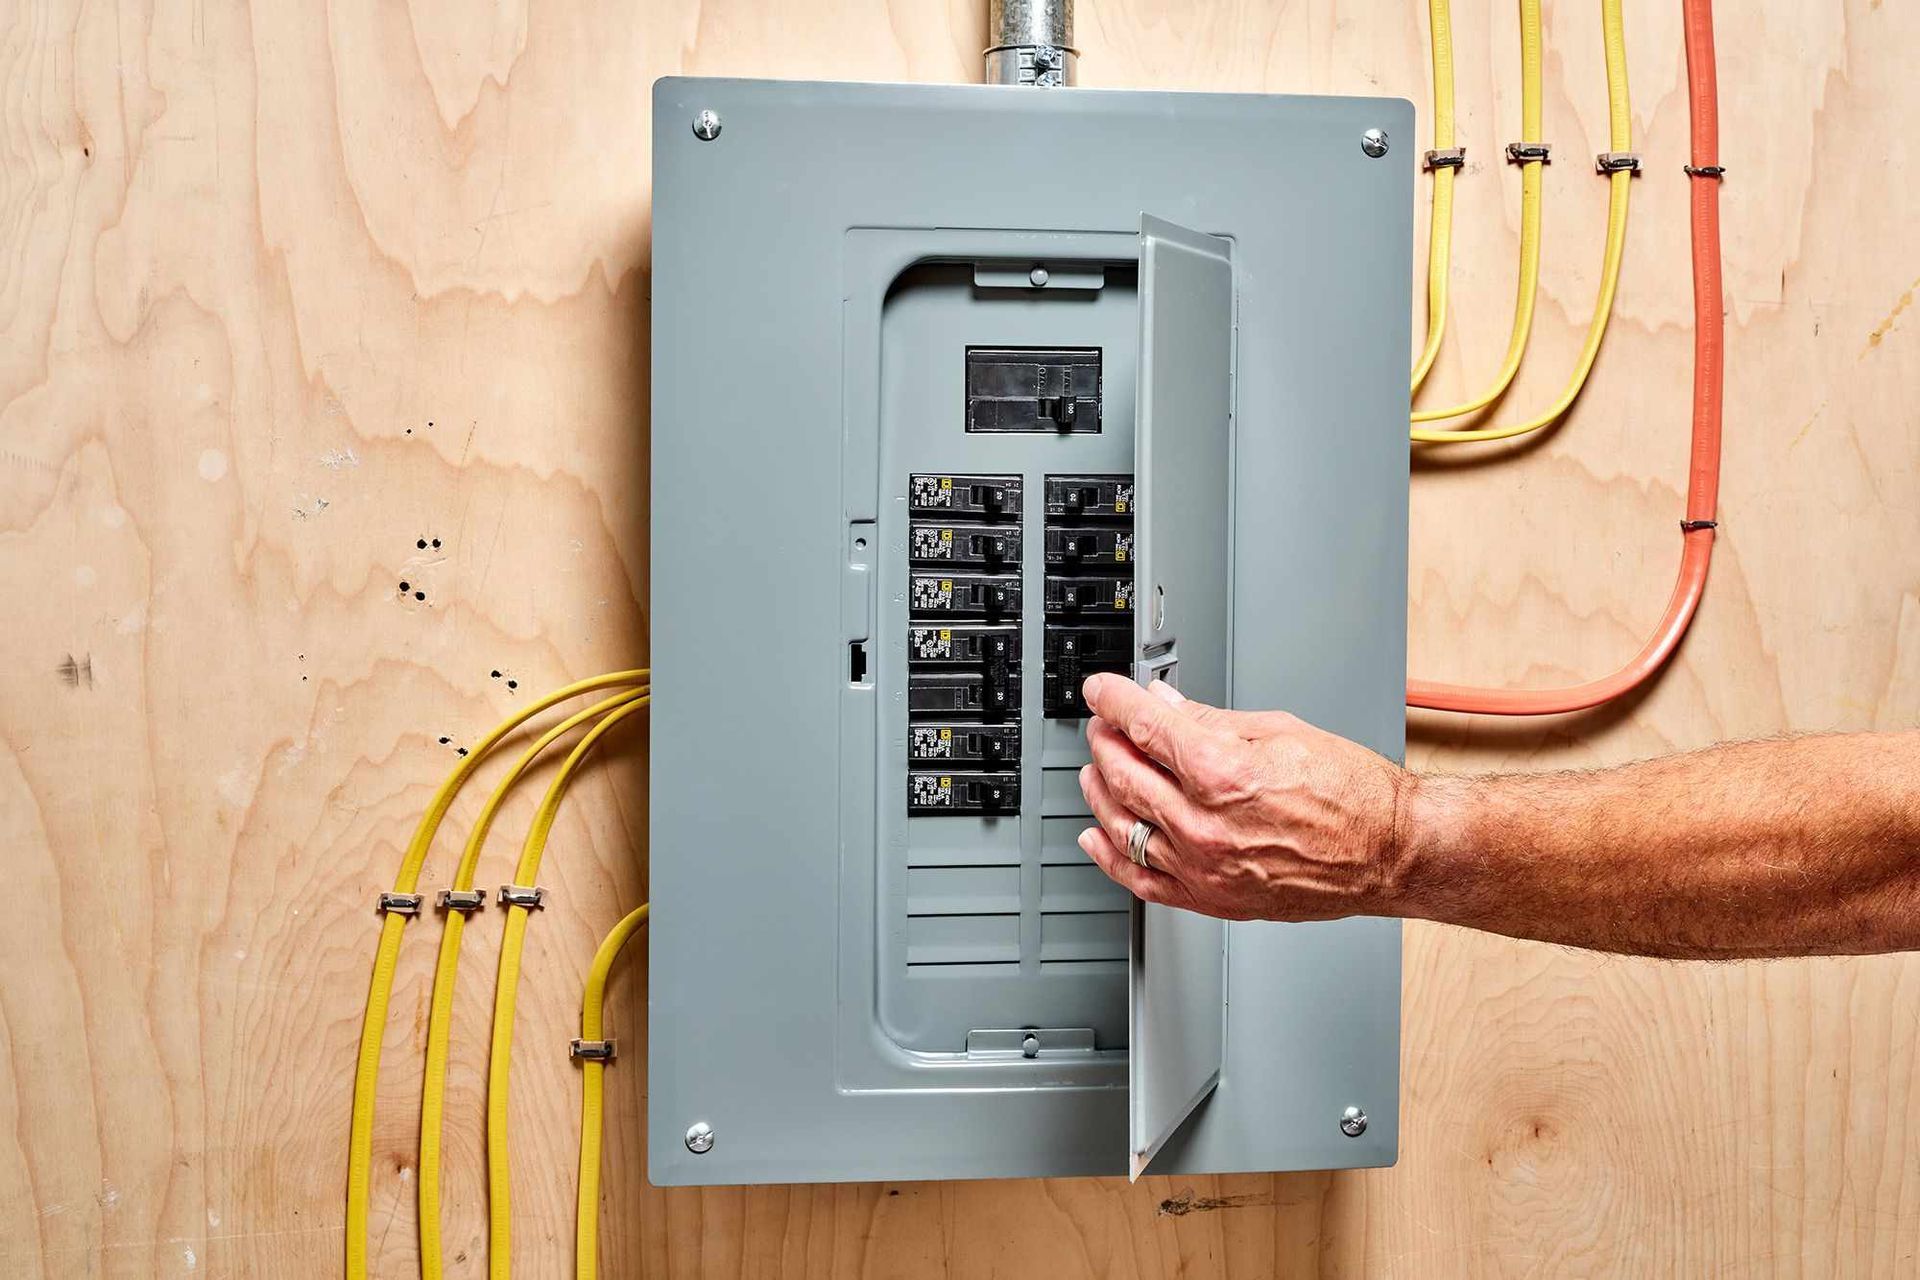
Replacing a bathroom exhaust fan may seem like a complicated task, but with the right tools and a little bit of handy work, it can be accomplished in no time at all. The first step is to turn off the power to the existing fan by flipping the circuit breaker or unplugging the switch. Next, remove the cover of the old fan and unscrew the screws or bolts holding it in place. Disconnect any wiring and remove the old vent from the ceiling or wall.
Now, it's time to install the new exhaust fan. Secure it into place with screws or bolts, reconnect the wiring, and attach the cover. Don't forget to turn the power back on and give your new exhaust fan a test run to ensure it's working properly. By following these simple steps, you can replace your bathroom exhaust fan and improve the air quality in your home.
How To Clean a Bathroom Fan
Bathroom fans help keep the air in your bathroom fresh and clean. But over time, they can accumulate dust, dirt, and other debris, which can obstruct their performance and cause them to malfunction. That's why it's important to clean your bathroom fan regularly to promote optimum airflow and prevent indoor air pollution.
Thankfully, cleaning a bathroom fan is not rocket science. In fact, with a few simple tools and techniques, you can have your bathroom fan running like new.
Step 1: Turn Off the Power
The first and most significant step when it comes to cleaning a bathroom fan is cutting off the power. This prevents potential electric shock and further damage to the fan. Before starting, make sure you switch off the breaker for additional precaution.
With electricity out of the way, you can move on to safely disassemble your fan and get rid of all the dust collected inside. Regular cleaning of your bathroom fan is key to ensuring that it remains in working condition while also keeping your bathroom clean and safe to use.
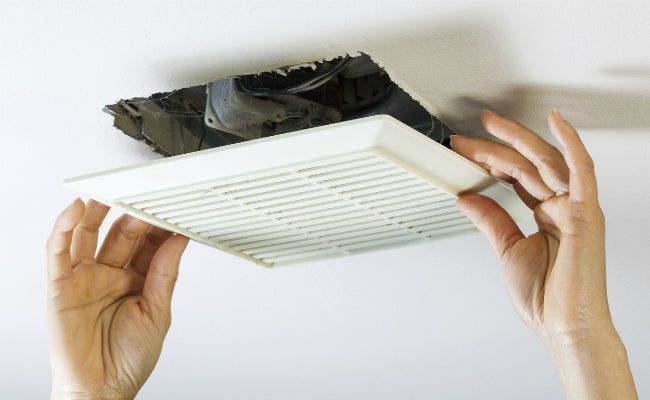
Step 2: Remove the Grill
Removing the bathroom fan grill can be an intimidating process, but with the right tools and a little patience, it is easy to do. First, find a screwdriver that fits the screws of your particular fan. Unscrew each of the screws around the edge of the grille and carefully remove it from the fan.
Keep track of any screws or washers you’ve removed, and make sure everything stays organized so you won’t have difficulty when it comes time to reassemble them. Once you've taken off the grille, give it a thorough cleaning to remove dust and debris.
Step 3: Clean the Blades
Once all dust and debris from the outside have been removed, move on to your bathroom fan’s blades. It is important to use a soft-bristled brush and a cleaning solution when performing this step, as anything too abrasive can damage your fan’s blades. Work in a circular motion, gradually working towards the center of each blade.
If there is any residue remaining, repeat the process with a damp cloth or paper towel. Be sure that all moisture and residue are wiped off completely before switching it back on. With regular maintenance, both mildew and dust should stay under control while ensuring the fan’s optimum performance.
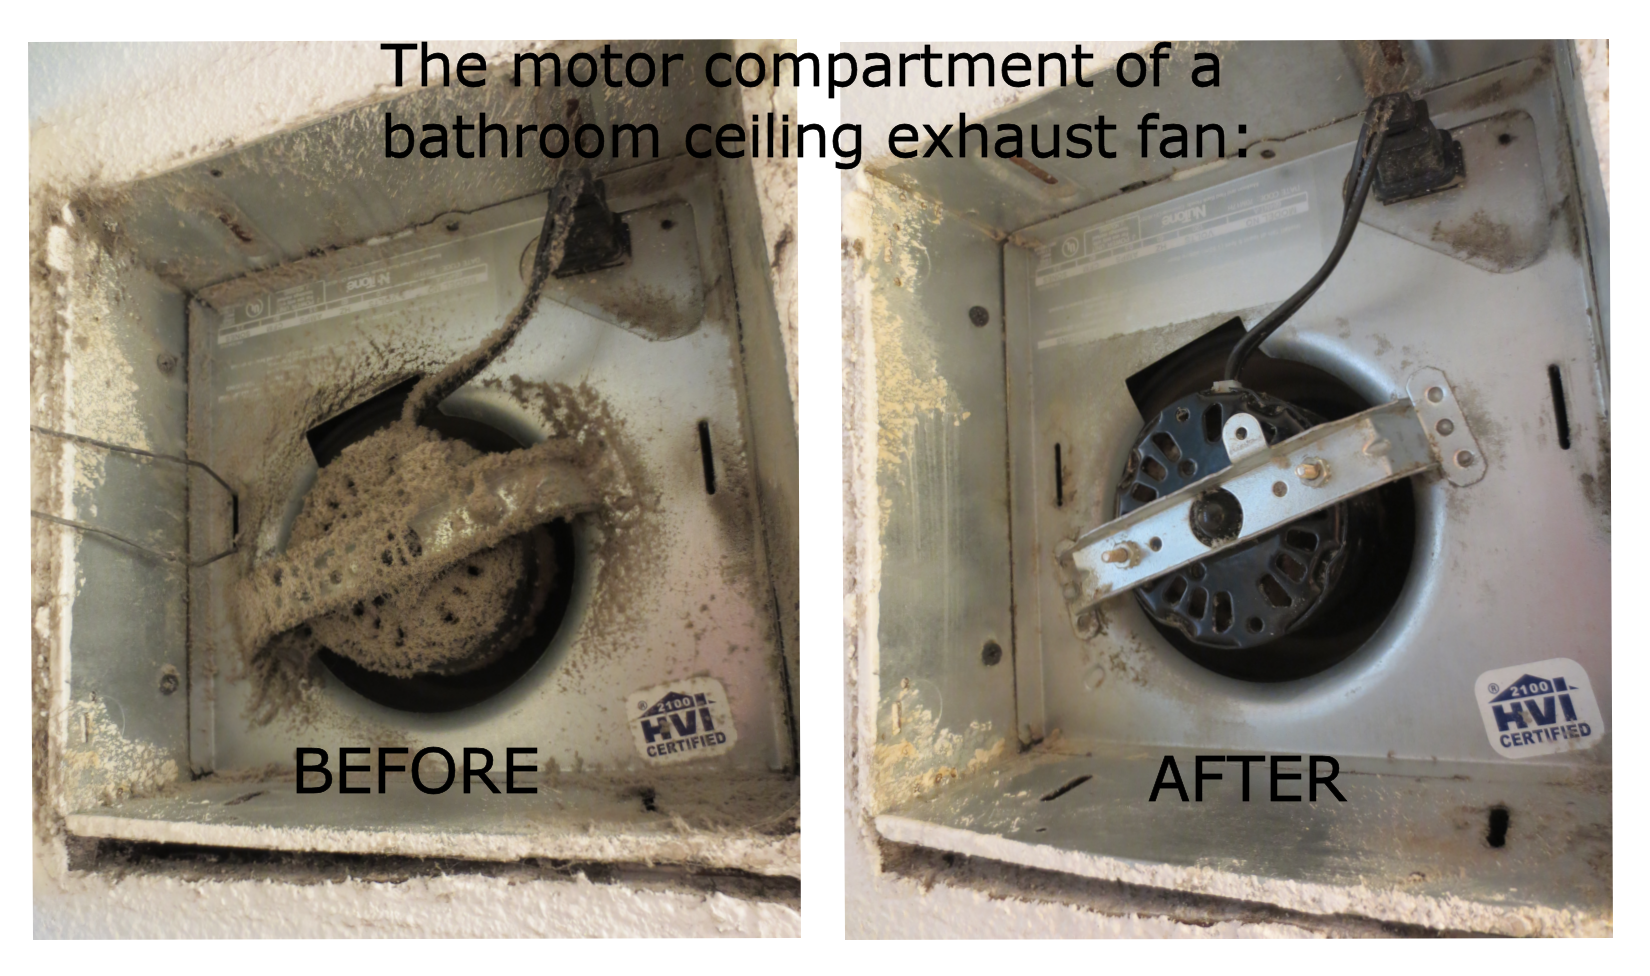
Step 4: Clean the Motor and Housing
Once you've vacuumed the debris out of your fan and scrubbed down the blades using a sponge, it's time to move on to cleaning the motor and housing. An important aspect of cleaning your bathroom fan is ensuring that no dust is left behind in any of the hard-to-reach nooks or crevices.
To do this, use a cloth and warm, soapy water to gently wipe away any dust that may be lurking in the fan's motor or housing. Make sure to clean all surfaces thoroughly, then use a dry cloth to remove any excess moisture and lint. By following this step in your bathroom fan cleaning process, you can guarantee that your fan runs at optimal capacity and last for years to come.
Step 5: Reinstall the Grill
Step five of cleaning the bathroom fan is reinstalling the grill. This is a crucial step as it allows the fan to operate without any issues and prevents debris from getting caught in the blades. To complete this step, take the pre-soaked grill and wipe it down with a microfiber cloth until all surfaces are clean.
Then, line up the mounting holes on the fan base and twist them on the grill until secure. Lastly, select a low setting for your fan and turn it on to ensure that all pieces are put back together properly, and there are no excess vibrations.
How Many CFM for a Bathroom Fan
One of the most important factors to consider when selecting a bathroom fan is the CFM (cubic feet per minute) rating. CFM is a measure of how much air the fan can move per minute, and it directly correlates with how effectively the fan removes moisture and odors from the bathroom. Generally, the recommended CFM for a bathroom fan is at least 50 CFM for every square foot of bathroom space. For larger bathrooms or bathrooms with higher ceilings, a higher CFM rating may be necessary to ensure proper ventilation. Ultimately, choosing the right CFM rating for your bathroom fan can help keep your bathroom clean, fresh, and mold- and mildew-free.
How do I pick the right size of fan (CFM) for my bathroom?
The fan airflow (CFM — cubic feet per minute) should match your bathroom size. For a simple guideline: about 1 CFM per square foot of bathroom floor area.
If you have additional features like a shower, tub, or jetted tub, some experts recommend adding extra capacity.
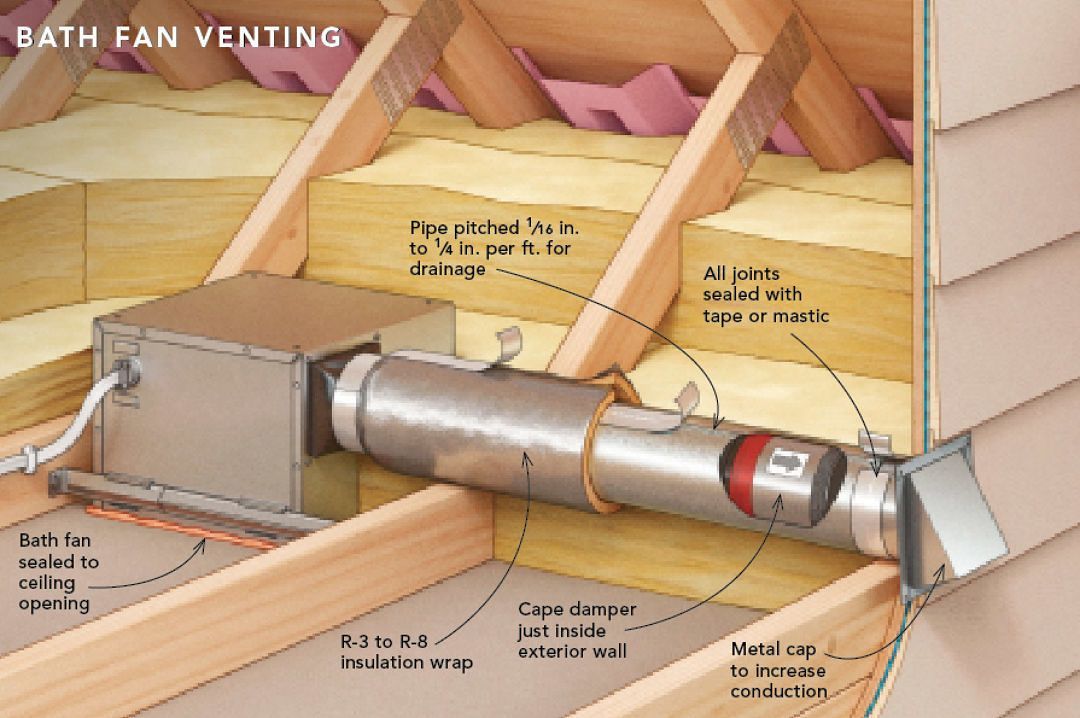
Where should the fan be ventilated to?
Always vent to the outside of the home — via roof or exterior wall. Do not vent into an attic, crawlspace, wall cavity, or another interior space.
Use ducting with the size specified by the manufacturer; the shortest, straightest duct run with as few bends as possible gives the best performance.
What tools and materials are required for installation?
Typical tools and supplies include: drill (or driver), saw (drywall or reciprocating), screwdriver, foil‑duct tape, metal or flexible ducting, vent cap, screws, caulk or sealant (for sealing gaps), wire nuts, appropriate wiring cable, maybe roofing materials (if venting through roof).
Can I install a bathroom fan myself (DIY) — or should I hire a professional?
es — many fan installation jobs are doable by a DIYer with basic carpentry and wiring experience.
That said — if your installation involves complicated ducting (roof/wall penetration), new wiring or circuit work, or local code requirements (e.g. GFCI protection for wet areas) — consider hiring a licensed electrician or HVAC professional.
How do I install (or replace) a bathroom fan — what are the main steps?
Turn off power at the breaker panel, and verify power is off before touching wiring.
Mark and cut the ceiling opening for the fan housing (if new install) or remove the old housing (if replacing).
American Home Shield
+2
The Home Depot
+2
In the attic or above the ceiling, place the fan housing between joists (or use mounting brackets), and secure it to the structural framing.
Attach ducting to the fan exhaust port, and run it as direct a path as possible to an exterior vent cap. Seal all duct seams, and seal around any ceiling/roof/wall penetrations.
Connect the electrical wiring properly (hot, neutral, ground), using wire nuts or approved connectors — and ensure wiring meets local electrical code (including GFCI if needed).
Reinstall the grille/cover, turn on power, test the fan — verify airflow (e.g. by feeling airflow at the exterior vent or using a tissue test).
How often should I clean or maintain the bathroom fan?
Clean the fan at least once a year — remove the grille, vacuum dust/debris from inside, gently wipe housing and blades (without getting motor or wiring wet), then dry thoroughly before reassembly.
If the fan is used heavily or the bathroom is humid, cleaning every 6 months may be better for performance.
What are common mistakes or pitfalls to avoid?
Venting into attics, crawlspaces, or other interior spaces instead of outside — causes moisture buildup, mold, and air‑quality issues.
Using duct runs that are too long, with many bends, or improperly sealed — reduces airflow and efficiency.
Forbes
+2
Building America Solution Center
+2
Poor electrical work: overloading existing circuit, not using proper ground or GFCI where required — risk of breaker trips, shock, or code violation.
Skipping maintenance: dusty or blocked fan — less airflow, more noise, worse ventilation.
What if I clean the fan and it’s still noisy or airflow is weak — does that mean I need a new fan?
Often yes. If cleaning doesn’t restore proper airflow or quiet operation, or if the motor seems worn, exterior housing is cracked, or the fan is old — a replacement is often the best long-term solution.
This is paragraph text. Click it or hit the Manage Text button to change the font, color, size, format, and more. To set up site-wide paragraph and title styles, go to Site Theme.
How to Vent Bathroom Exhaust Fan
A bathroom exhaust fan is an essential component for maintaining a healthy, pleasant bathroom environment. However, it can be frustrating when it doesn't properly vent out humid air, leading to mold growth and unwanted odors. If you're not familiar with how to vent your bathroom exhaust fan effectively, don't worry, it's a relatively straightforward process. The first step is to determine where your fan vents. Ideally, it should vent to the outside, preferably through the roof or wall. Then, check for any blockages in the ductwork and clean the fan blades periodically. Lastly, ensure the fan is correctly sized for your bathroom's square footage to remove excess moisture adequately. With these simple steps, you can create a comfortable and safe bathroom environment for you and your family.
Who To Hire to Vent a Bathroom Fan
Installing a bathroom fan is an essential task for any homeowner. Not only do these fans help to keep your home free of humidity and odor, but they also prevent mildew and mold from forming in your bathroom. But before you can reap the benefits of a bathroom fan, you’ll need to find the right professional to install it properly. AC-DC Electric is just a phone call away at 970-330-1656
Considerations Before You Hire Someone
When hiring a contractor for your bathroom project, it's essential to have all the necessary information about what needs to be done. One of the critical things to consider is the type of fan to install and its placement in the bathroom.
Perhaps you need additional ventilation or exhaust tubing to improve the fan's effectiveness. Having this information at hand will help you narrow your search for the right contractor qualified to handle the job. It will also ensure that your contractor can offer helpful advice, make suggestions, and provide an accurate quote based on your needs.
Please don't overlook the importance of having the correct information before you choose a contractor, as it can affect the outcome of your bathroom fan project.
Do Your Electric Company Research
Installing bathroom fans can be intimidating, especially if you're not familiar with the process. That's why it's imperative to research contractors in your area who specialize in this type of work. By reading online reviews and talking with friends or family members who have gone through similar projects, you can get a sense of which electrical contractors are trustworthy and reliable.
Don't rush into choosing an electrical contractor without doing your due diligence – take your time to find the right fit for your needs. With a little research, you can have the peace of mind that your bathroom fan installation will be done right.
Hire a Professional
When hiring someone for a home renovation project, it's essential to ensure they are licensed and insured. Not only does this provide you with peace of mind, but it also means that if anything goes wrong during the installation process, they can be held liable for any damage caused by their work.
Additionally, it's critical to inquire about their experience with venting bathroom fans. This is a vital aspect of any bathroom renovation, and hiring someone experienced in this area can prevent costly mistakes and delays.
It's always better to be safe than sorry, so before hiring anyone, do your homework and ask the right questions. Call AC-DC Electric we are experts at installing & venting bathroom fans call 970-330-1656
How Do Bathroom Fans Work?
Bathroom fans are simple yet highly effective ventilation systems that help reduce the humidity levels in your bathroom. When you turn on the fan, it draws out moisture-laden air from inside the room and forces it outside through a vent or exhaust duct. This process helps remove unpleasant odors as well as excess moisture, which can prevent mold growth and other damage caused by humidity.
The typical bathroom fan contains an electric motor that powers a fan blade to move air out of the room. This motor is connected to the switch on your wall or ceiling, which allows you to turn it on or off. The electric current is routed through thick wires embedded in the wall or ceiling and then connected to the motor inside the fan housing.
When you press the switch, electricity flows through these wires and activates the motor, which begins turning the fan blades. As they spin faster, they draw more air from inside your bathroom out into the atmosphere outside.
When selecting a new bathroom fan for your home, there are several important factors to consider, such as:
● Size (measured in cubic feet per minute)
● Type (vented versus ductless)
● Noise level (measured in sones)
● Installation requirements (wall or ceiling mount), and
● Energy efficiency ratings (measured in CFM/Watt).
It’s also important to pay attention to local building codes for bathrooms because some jurisdictions require specific types of fans with certain features, such as fire sprinklers or alarms.
Additionally, some states have laws requiring all new homes built after a certain date must have certain types of high-efficiency fans installed in all bathrooms. Doing research before buying can save you from costly mistakes later on down the road.
Bathroom fans are a crucial feature of any home's ventilation system. They serve a primary purpose: removing moisture and humidity from the air, which can lead to mold and mildew growth. But beyond that, bathroom fans also help remove unpleasant odors and improve the overall air quality in spaces prone to accumulating bacteria and allergens. Installing a bathroom fan is a simple yet effective way to protect your home and your health, making it a wise investment for any homeowner. Whether you're looking to upgrade an existing fan or install a new one, there are a variety of options available to suit your specific needs and preferences.
Our Experience
At AC-DC Electric, we have been providing residential and commercial electrical services for over 4 decades. Our experience has taught us the best ways to perform various procedures.
Our management and staff have witnessed the evolution of electric systems and gained a deeper understanding of how they work. Thanks to our experience, we rarely encounter issues we haven't seen before.
Our knowledge
Each of our electricians and technicians is licensed, certified, and trained to provide high-quality services. We understand the importance that electric systems play in both residential and commercial properties. This is why we handpick the best staff who are both knowledgeable and have demonstrated their ability in a variety of situations.
At AC-DC Electric, we foster an environment that encourages excellence. You can count on our electricians and technicians to get the job done quickly and skillfully.
Our Transparent Pricing
Dealing with an electrical problem at home can be incredibly distressing, and many electricians and companies are willing to exploit people experiencing such issues by charging them high fees. At AC-DC Electric, we strive to provide high quality services at affordable rates.
Our experts can also offer you a free estimate before you hire them. This ensures you remain aware of how much you will need to pay before using our residential electric services.
You might also like